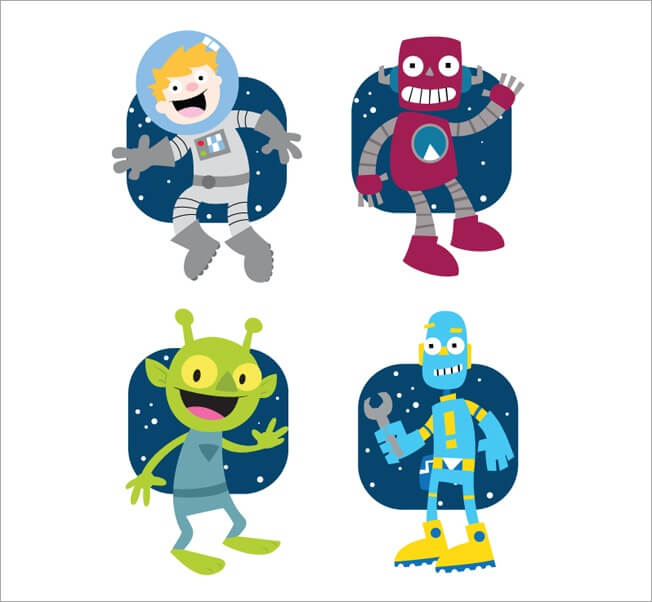
Hello guys, it is time for a new tutorial. If you are a Twitter user probably you have seen our site, including the background. If you haven’t let us tell you that we created a pretty cool background with some great characters. What we are going to do is show you step by step how to create one of this characters using Adobe Illustrator, so lets get it started.
You can see this lovely character at Iconshock’s twitter.
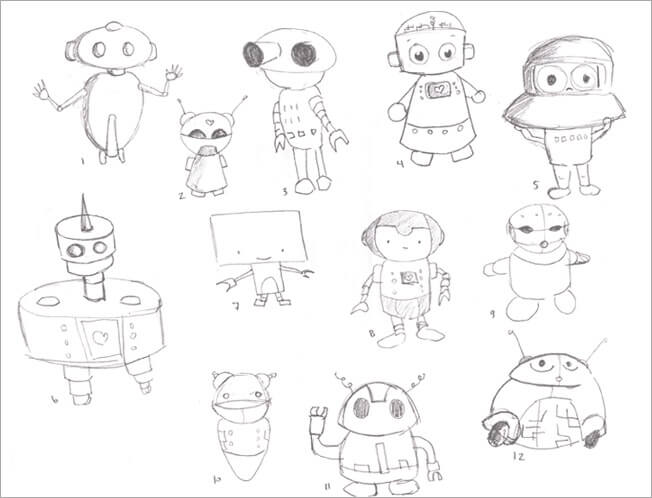
2. See what other people have done
It’s always useful to open up your mind a little before starting a project, and by open your mind I mean to grab some time to take a look at the proposals that other people have done, this will help you to decide how to proceed in some aspects of your design.
3. The pencil always goes before the mouse
Don’t forget that some of the greatest ideas where written with paper and pencil. Take your old notebook and sketch for a while.
4. Create your Canvas
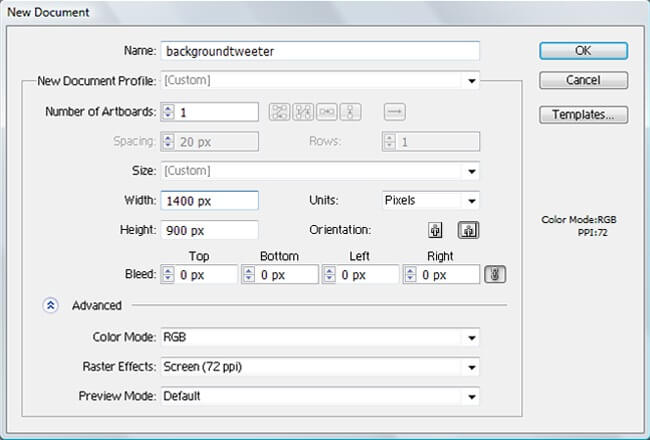
There’s not an specific document size if you are working with illustration, as long as the design maintains a nice proportion and zero pixilation. Because we were making this for our twitter background, we created a large canvas. Go to File>New and create a 1400 px X 900 px file, 72 dpi and RGB color mode.

5. Starting our astronaut
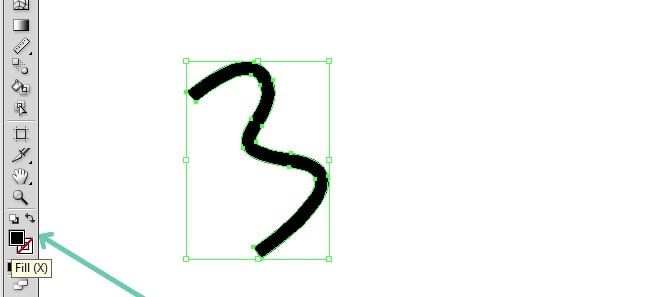
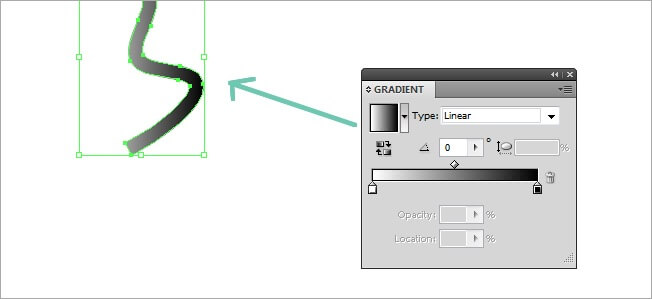
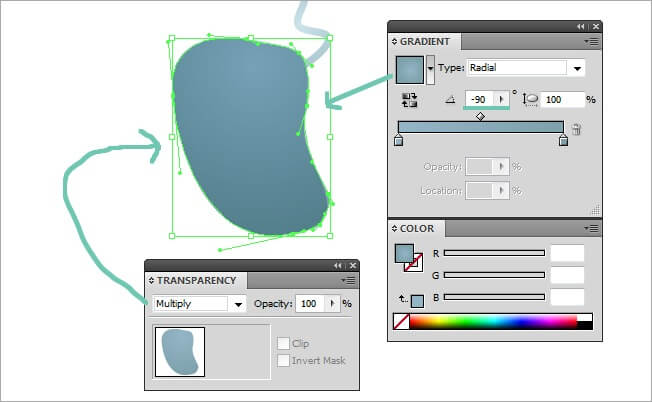
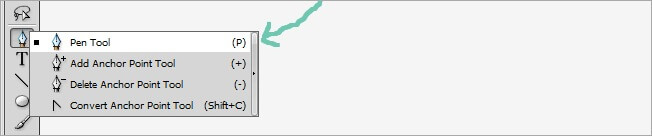
One way to start a design is to first draw the tiny details and then the large shapes. Select the pen tool (p) and draw an irregular stroke that resemblances an S letter.


Now we need to increase the stroke value of the line, to do that, first select the shape with the selection tool.

After selecting the object, go to the stroke options at the top of the window and increase it to 7 px.

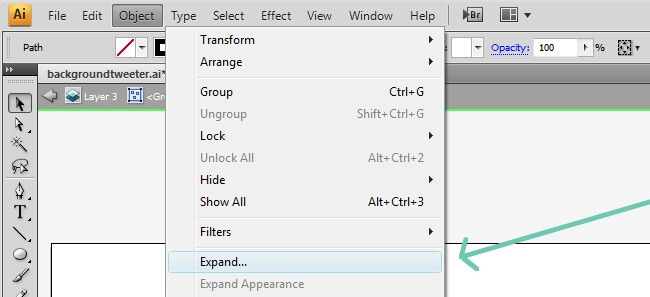
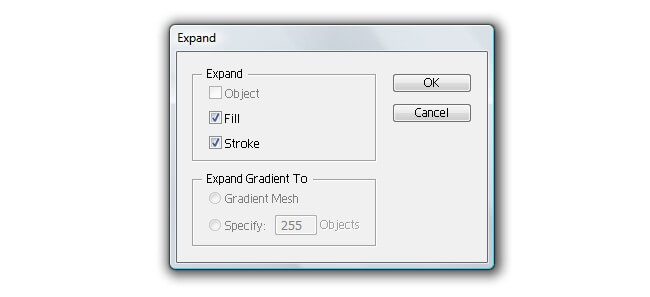
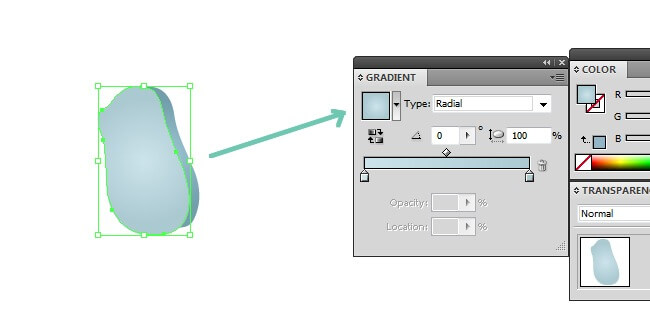
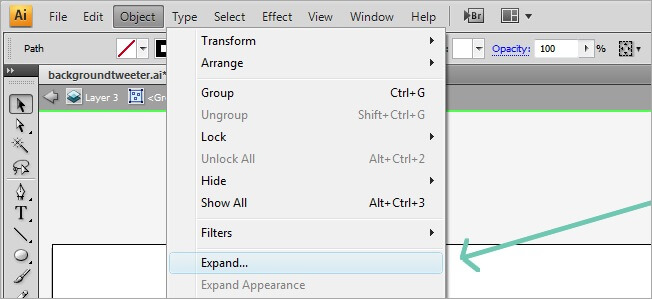
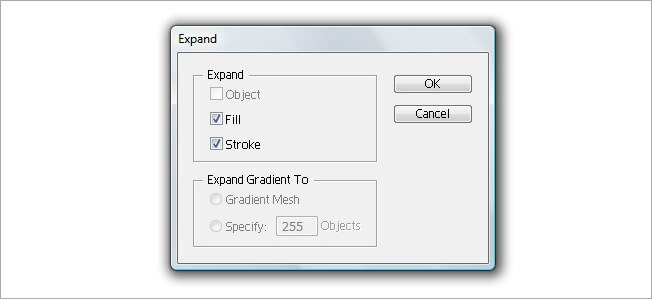
And now some magic, lets turn this shape into a fill. Go to Object>Expand and leave all the options checked.
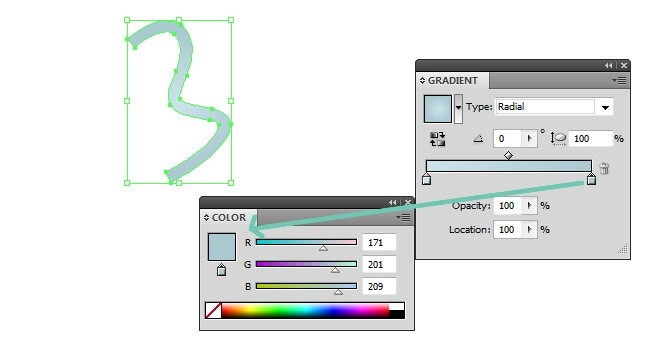
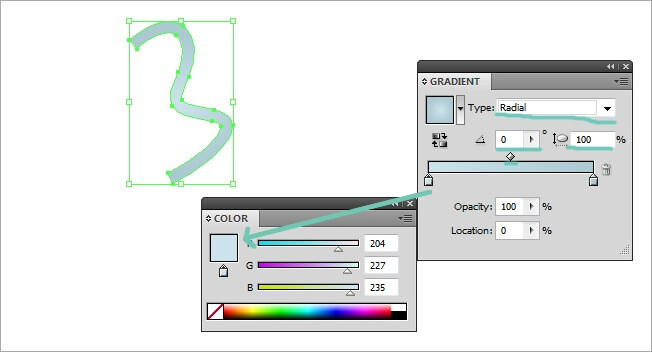
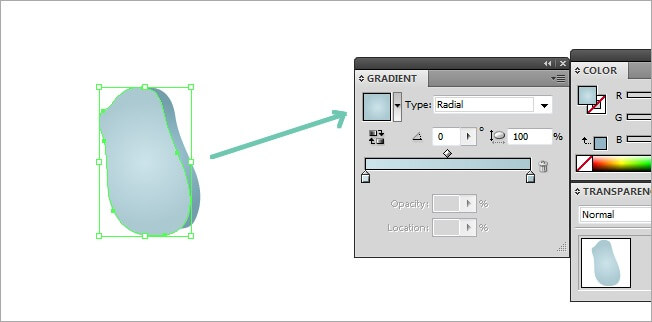
By doing this, we can now edit our shape as a fill, which means that we can add it a lot or properties. What we are going to do now is to change the plain color of the figure for a gradient. Select the object and make sure that the fill box is on top.

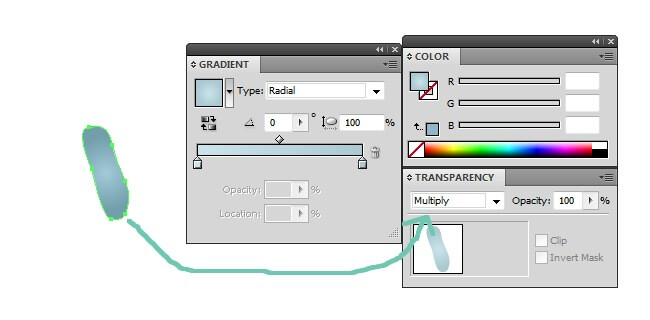
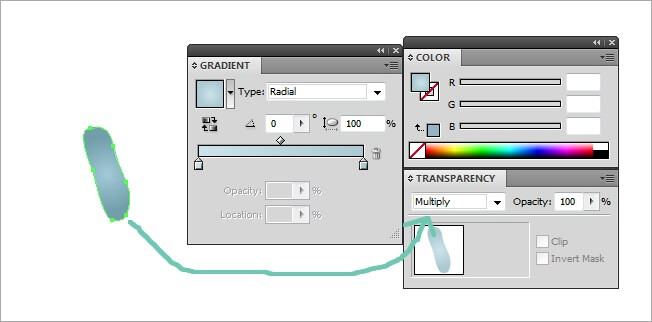
I don’t like black for an astronaut’s sweet, I think I’m going to change it for a nice gradient. Go to the gradient window and assign one fill gradient to our object.
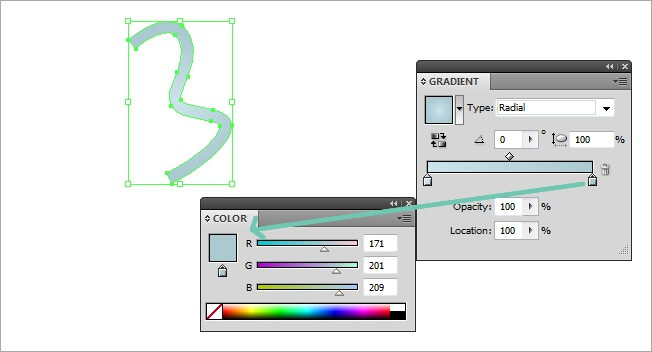
The next thing to do is to adjust the gradient parameters, we will be using a lot this fill, so pay attention to the values we are entering. Replace both color indicators for a light blue, one darker than the other. Also change the type from linear to radial with a 100 % aspect radio. If you don’t see either the gradient or the color windows, you can look for them at the Window tab on top of the program.
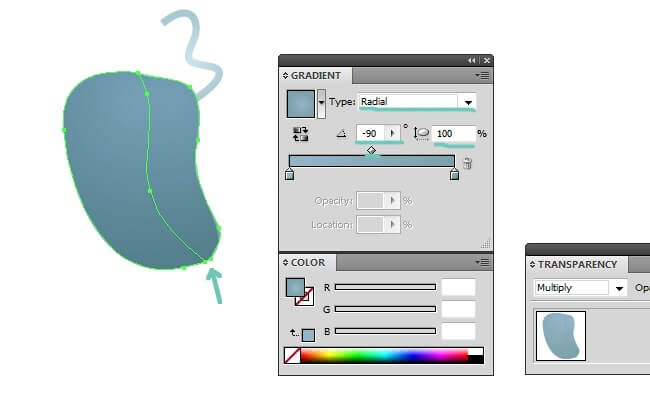
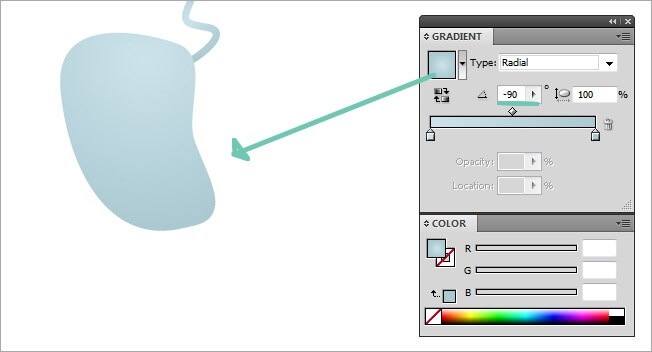
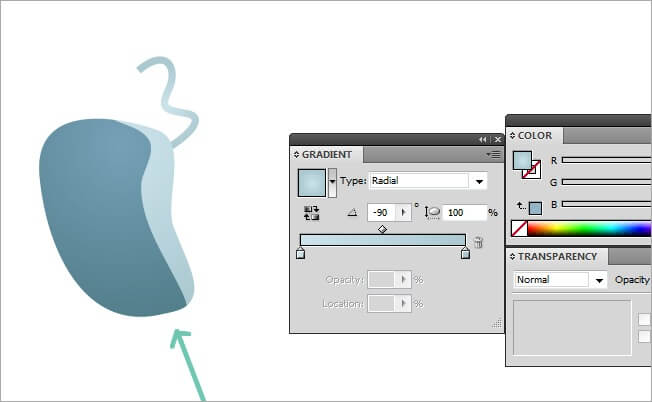
Using the pen tool we drew something like this. Leave the same gradient that we used before, but adjust the angle value to –90. So far we are doing pretty well.

Its time to play with the volume. Select the last object we did and copy paste it right in front of the original (Ctrl + C, Ctrl + F). Then change the angle in the fill parameters to –90. You also need to change the blending mode from Normal to Multiply.

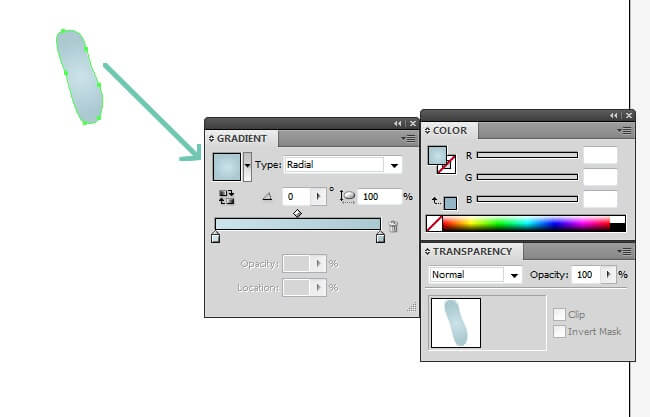
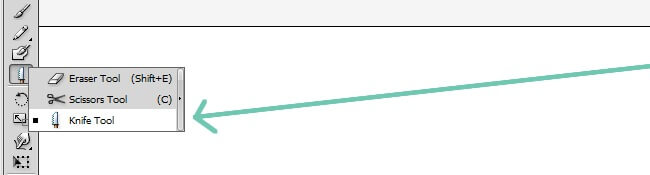
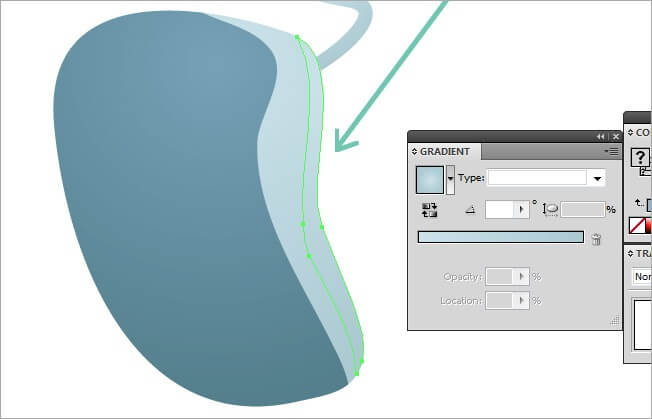
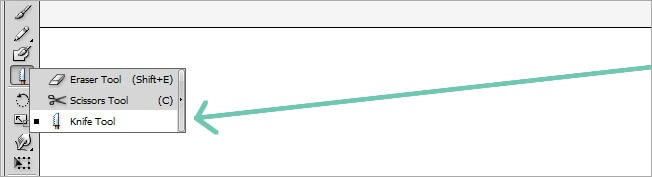
At this time many must be asking themselves, why did we made the first shape if it’s going to be covered by this one?. Well, that’s not completely true. We are going to cut a piece of this new shape. To do this, we need to use the knife tool, it’s very simple, just select it and draw a smooth line, then you will see how the shape gets splitted in two.


Simply select the right side of the figure and delete it so you can see something like this.
We now have the shadow, but we are missing the glow, the light must be coming from somewhere. Use the knife tool one more time but in this case over the lighter shape, you will get something like this.

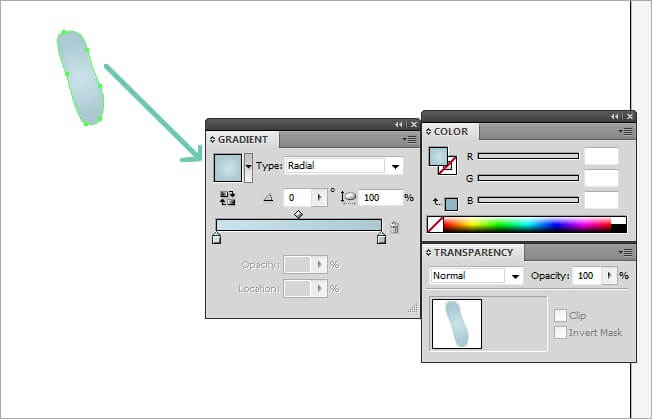
Very simple shape the one coming up next, just draw it using the pen tool and leave the gradient we have been using with a 0 angle.

Copy and paste the shape we just did, then change its blending mode to multiply.
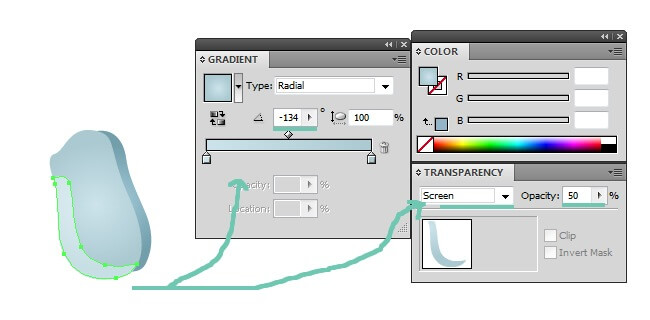
More simple steps, draw another shape next to the last two and leave the gradient properties unmodified.
Copy paste the figure (Ctrl + C, Ctrl + F), then use the knife tool to create a glow at the left side of the figure and a shadow on top, then clear the remaining parts. For the left glow do not change the colors but the angle, switch it from 0 to –134. Also modify the blending mode to screen and 50 % opacity.


For the shadow leave everything as the original but change the blending mode to Multiply. It’s very important to do this over a copy, because if you don’t, the blending styles won’t work as you expect.

In this part we are going to determine if our buddy is a chubby, slim or regular guy, it’s up to you. Grab your pen tool and draw the main body of our astronaut. Don’t change the colors of the gradient, but adjust the angle to –55.


The beauty relies on the details, or at least that’s what I’ve heard. Select your pen tool and create a thin line over the left leg.


We are changing our gradient values for the first time. Switch to red and dark red, left to right respectively. Assign it a radial type and a 57 angle.


The other leg needs the same touch, so use the pen tool and draw it, you don’t need to change anything at the gradient window.

Now we need to generate the volume of our astronaut’s spacesuit. Generate a copy of the original body (Ctrl + C, Ctrl + F) so we can start working with the knife tool.

The first cut we are going to trace goes over the upper side of the left arm, something like this:


If we look at the foot and then at the arm, we will realize that the light is not correct. To fix that, change the new glow shape we have just cut and change the blending mode to screen and the opacity to 50 %.

Now over the left leg, repeat exactly the same process that we just did.


Keep doing it, the power of the force is with you. Same process to the right arm.


Now down to the right leg. It’s quite easy once you have mastered the way things are done.

OK, we are done with the main highlights of the spacesuit, it’s time to add the shadow. Repeat what we’ve doing during the last steps, knife tool and gradient adjustments.

Change in the Transparency window the following values: From Screen and 50 % opacity to Multiply and 100 %.

Back to the left arm, you know what to do.


The next shape requires a small trick. We need to create a new copy of the original shape and place it on top (Ctrl + C, Ctrl + F). Now use the knife tool to create the chest of the spacesuit, we need to do it over a new copy because we are cutting through a part we’ve already cut.

Clear all the rest of this new copy.

Now, use the knife tool one more time over the previous shape where we were doing the glows and shadows. Generate a shadow over the left leg.


6. The Astronaut’s head
This part is maybe the key for achieve a good quality illustration, we are going to draw our character’s head. The first step is to create the main head shape. Use the ellipse tool to draw a circle.


OK, now use the ellipse tool to create the ears.


And now the trick. Select the three circles and look for the pathfinder at Window. Then select the first icon of the first row, that will mix them all into one single shape.


The fill it’s done easily. Just select the shape and assign it the gradient values that we are showing you at next with a linear type and a –90 angle.


This guy have a basketball instead of a head, ha ha. Let’s give him some hair to make him feel good, take your pen tool and design the hairstyle that you prefer, we give him a classic haircut with a dark gradient, linear type and –90 angle. Remember that when using the pen tool, you can click over the anchor point to make a straight turn, which is something that we need to do in order to generate the hair.


To give him a beard, you can either create a copy of the face and cut it with the knife, or take a risk and draw it with the pen tool, both options work.

Play with the gradient values until you get a nice beard appearance. Although you must remember to leave it linear and –90 angle all the time.


Oh no, our astronaut is blind, he needs a couple of eyes to see the beauty of the moon. Select the ellipse tool and draw the right one.


And now, select the eyedropper tool while the eye is still selected, then click over the hair to clone the fill style.


Select the eye and copy paste it, then move it to the left, the astronaut is blind no more.

We need to make him a little bit more real, so let’s draw a couple of eyebrows. Simply use the pen tool to create it and the gradient will come automatically because it was the last fill that we used.


Copy paste this eyebrow (Ctrl + C, Ctrl + F) and go to Object>Transform>Reflect, then verify that vertical is checked and hit OK, place it over the left eye.


He can see but not speak, some girls will love that, but we don’t, so let’s give him a mouth. Create it using your pen tool and adjust the gradient colors to white to the left and gray to the right, also leave the type linear and the angle –90.


For the next step, use the pen tool once again and draw it in top of the last shape we did, leave the gradient values the same but change the colors to red and dark red.


We have completed the head, but we know that there is no oxygen in space and for that reason our astronaut needs a helmet. The process is very simple, use the ellipse tool to draw it and change the gradient colors to blue and light orange (right to left), leave unchanged the other values.

Once you’ve done it, go to Transparency and change the blending mode to Overlay and reduce the opacity to 40 %.


Without lighting effects our helmet will look like a simple gradient shape. Use the pen tool to create two shapes similar to an exclamation sign, then select and join the two pieces using the pathfinder tool.


Don’t touch the gradient values, just the colors. Change both to white but reduce to 0 % the opacity of the left one.

The glass alone will probably break, so it probably needs some protection. Grab the pen tool and draw a shape on the upper side, then use the eyedropper tool to copy the fill properties but switch the angle to –78.


Proceed by making a copy of this shape so we can use the knife tool one more time. Once you have placed the copy, make a first incision over the upper side, then adjust the properties as the ones we show you at next. (type>radial, angle>-78, screen and 50 % opacity).


OK, more highlights. Use the knife tool again to generate a shape over the right side of the helmet, then check that both the gradient and transparency properties remain the same than the last one.

We are missing the shadows, lets make a large shape by cutting with the knife tool the lower side of the helmet. As you have seen, the difference between shadows and highlights relies on the transparency window, in this case, you must switch those properties to screen and 50 % opacity.

After completing the space helmet, lets draw a tiny line across the body to give our character some extra detail. Make sure that the stroke is set in 1 px and the opacity 50 %, also make sure that you’re drawing a stroke and not a fill.


Did you realize that our guy was missing his hands?, he needs them to grab some space rocks and place the flag over the moon. Pick up your pen tool and draw the left hand, regarding the fill, use the eyedropper tool to copy the properties of the body, also make sure that the angle is set in 90 degrees.


Now the highlights of the hand. Generate a copy of the hand and place it over the original (Ctrl + C, Ctrl + F), then use the knife tool to slice a piece of the shape.
Leave all the gradient properties untouched and change the transparency to screen and 50 % opacity.

Proceed by tracing a line with the knife tool at the lower side of the hand’s copy and clear all the rest. Adjust this shape properties to multiply and 100 % opacity.

The same process must be completed to create the right hand. So first, draw the basic shape with the pen tool.

Then use the eyedropper to copy the properties of the left hand’s mid tone.

Be patient my friend, we are almost done. As we did with the left one, copy the hand and paste the duplicate exactly over the original. Then use the knife tool to trace where the shadow is supposed to be.
Finally, copy the properties of the left hand’s shadow using the eyedropper tool.

Same way for the highlights, slice the hand’s copy at the upper side.
Now copy the fill properties of the left hand’s highlight with the eyedropper tool.

I think we are almost done. The only thing left to do is the left food, so hurry up and lets finish our astronaut. Pick the pen tool and draw the main shape for the foot.

Copy paste the foot so we can start working on the highlights and shadows. Then use the knife tool to divide the shape and generate the shadow.
This shadow is darker than the rest, so copy the fill properties directly from the darkest gradient at the back using the eyedropper. Make sure that the transparency is set on Multiply, 0 angle and 100 % opacity.

The highlight is less visible than the shadow, due to the volume reference. Cut it with the knife tool and clear all the spare parts.
Now copy the fill properties from the right foot’s highlight with the eyedropper.

The next step is going to be made with no slices or copies. With the pen tool, lets draw a shape at the upper right side of the foot.
After that, copy the fill properties of the foot’s mid tone, make sure to leave in Normal the blending mode.

Finally, the last thing before our astronaut is complete. Lets draw a volume shape over the left foot’s shadow.
Now use the eyedropper tool to copy the right foot’s shadow properties.

Houston, we have no problems. Our astronaut character has been completed. We have learned to take advantage of tools such as the knife and eyedropper tool to generate some pretty cool drawings. Feel free to check the complete background within our Twitter. See you around guys.