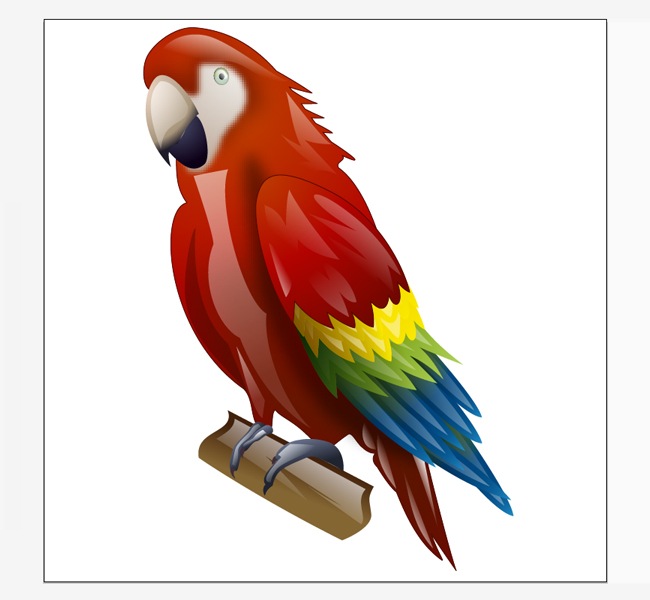
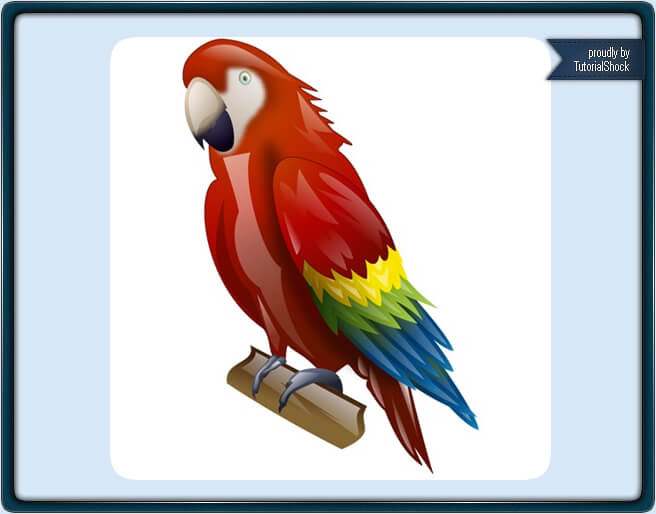
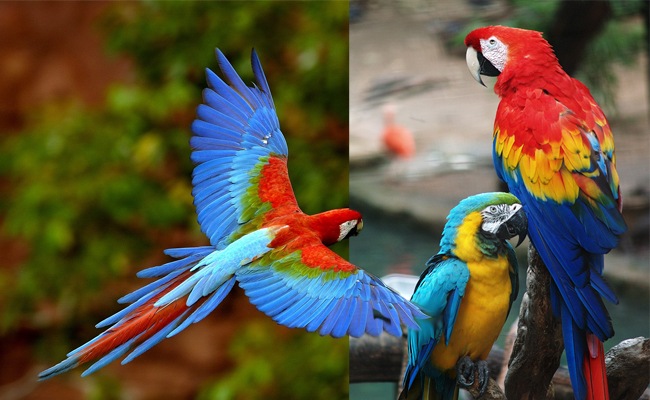
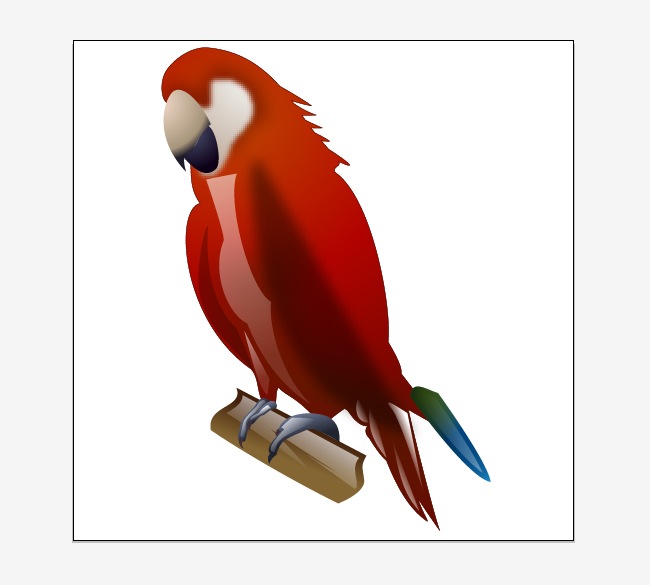
Hello guys, today we are going to guide you on how to create a realistic icon, in this case, a realistic macaw, full of colors and volume. We will be using Adobe Illustrator and its pen tool, gradients and blur filter, it’s time to begin.
1. Start from real elements
When making real life elements, it’s very important to understand how they are affected by its surroundings, elements such as sunlight, shadows and reflections must be taken into account. Take some minutes before start drawing to gather some real life references.
2. Make it of your own
There is no better way to appropriate of something that by painting it, because that will provide you a lot of confidence and knowledge regarding the element you are studying. Draw some quick sketches before we go to the computer. You can even draw a brilliant object on paper and then vectorize it.
3. Create canvas
Because we are going to work for web, we suggest that your document’s properties must be 250 X 250 pixels, RGB color mode and 72 DPI.

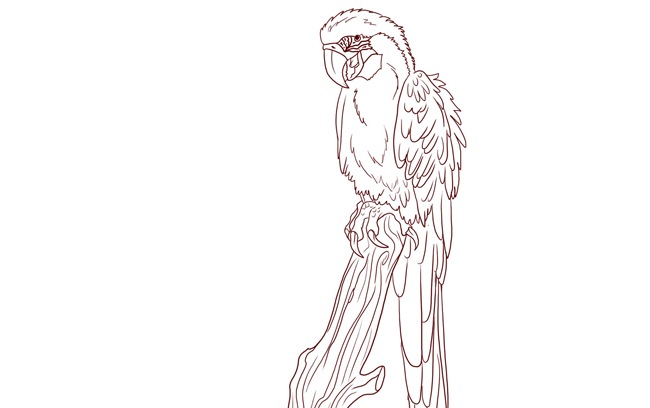
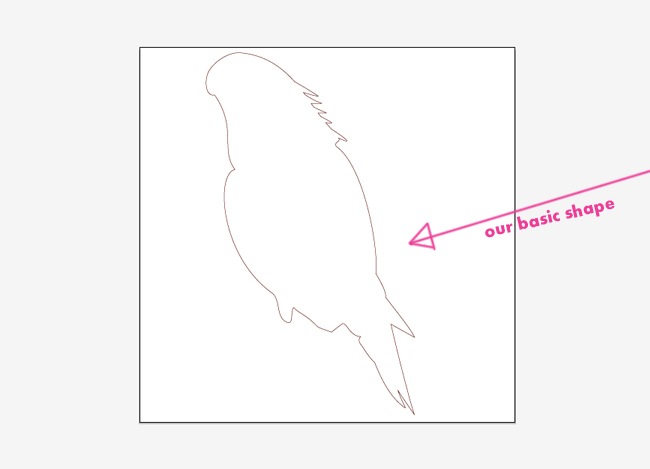
4. Starting our Macaw
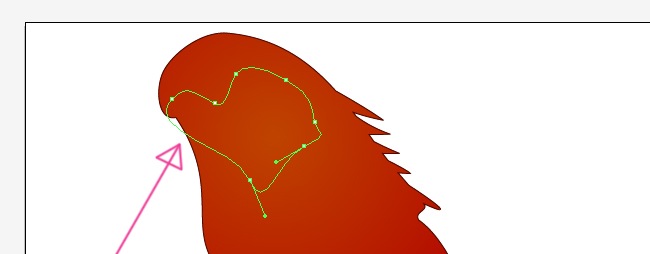
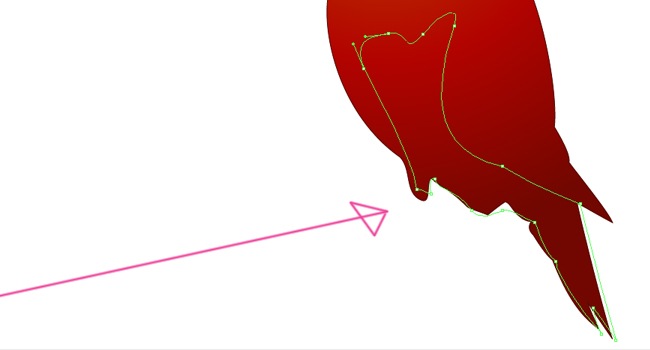
The first thing you need to do is the larger shape of the macaw to help you with the proportions and volume management. Select the pen tool and proceed drawing something like this.

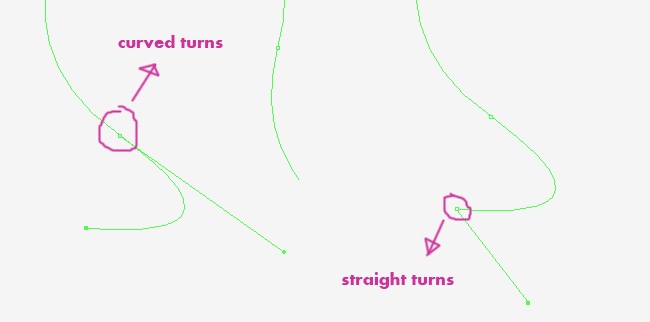
Creating this shape requires a lot of patience, do not rush. Remember that by clicking over the last anchor point you did, you can make straight turns instead of curved.
Take advantage of your screen, zoom when it becomes necessary using the zoom tool (click to zoom in and click when holding Alt to zoom out) or clicking while holding Ctrl + Space.

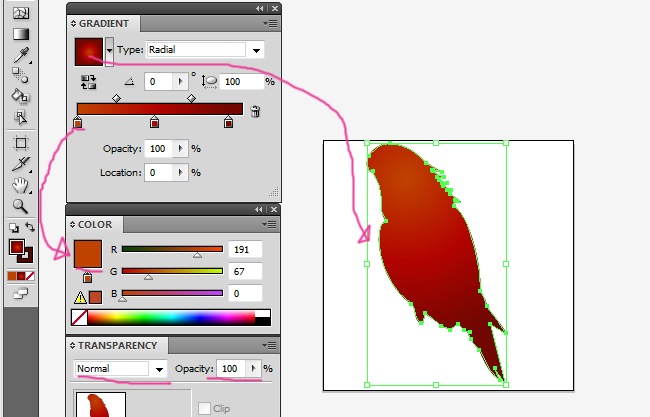
Now adjust the properties of the shape. We can use a lot of colors while we’re making our macaw. Select the shape and adjust the stroke color first, towards a crimson tone.

The stroke must be thin, not too thick, we think that a 0.31 stroke is more than enough.

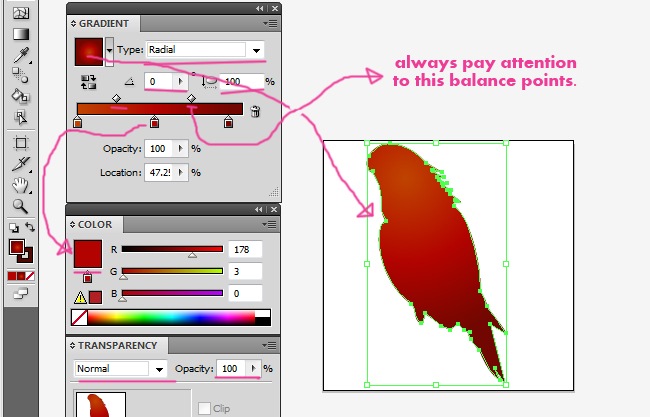
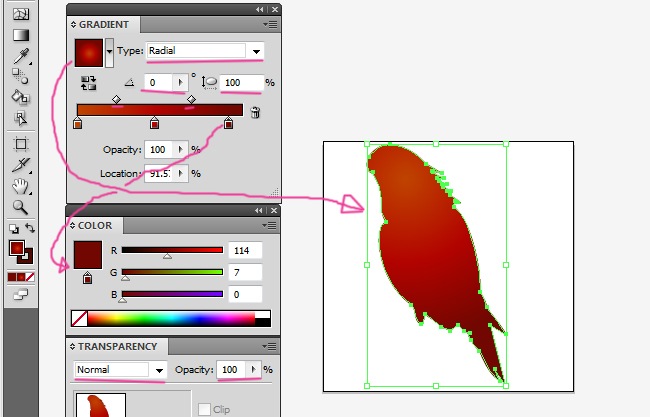
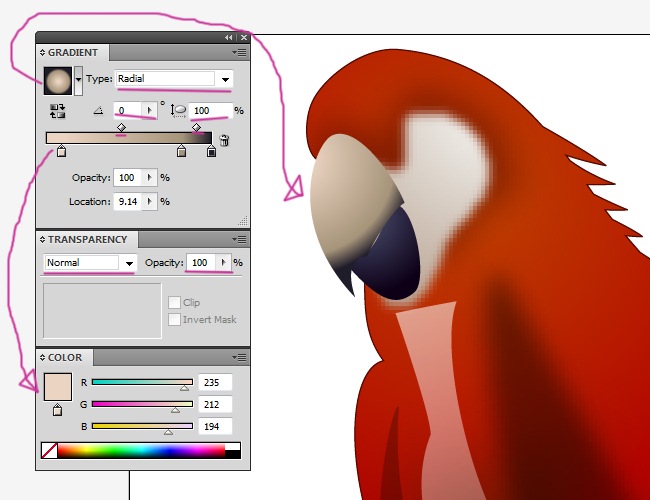
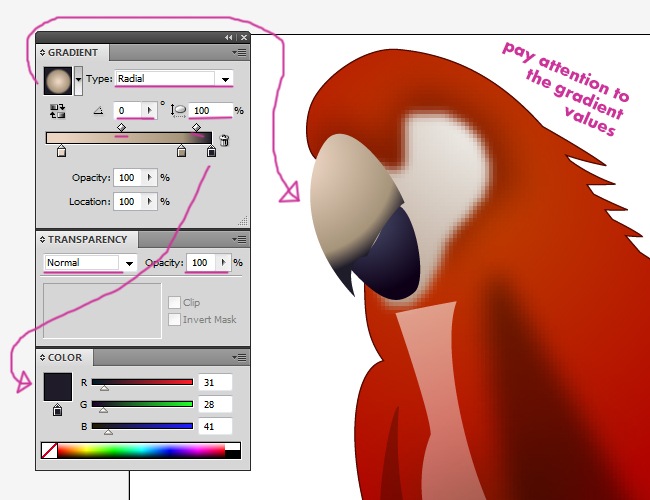
Regarding the fill, let’s generate a gradient appearance to the shape, first, go to the gradient window (Window>gradient) and add an extra point at the middle of the gradient bar. Also leave the gradient parameters set to radial, 0 angle and 100 aspect radio.

The three color points must be similar between each other to make a realistic gradient effect.
5. Working with clipping paths
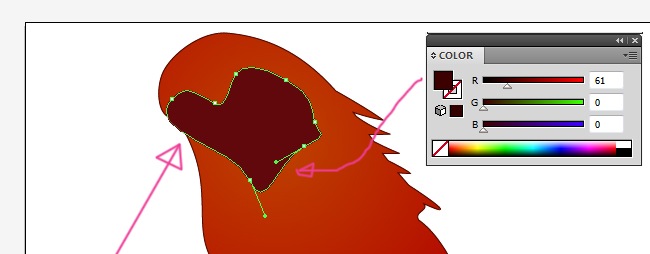
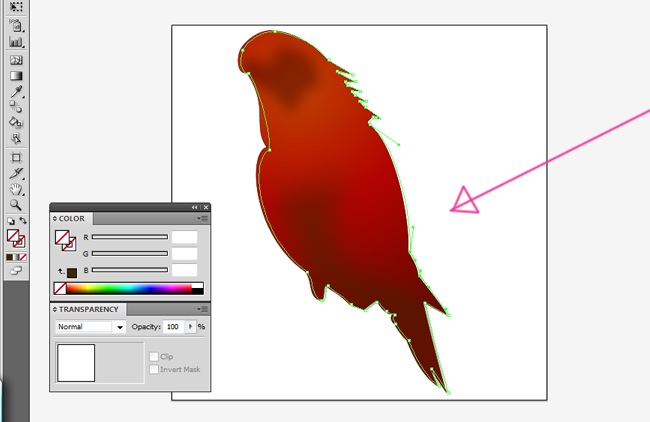
Sometimes when you are working with irregular shapes, blurred fillings and similar, there are many parts of this elements that are left outside the area we want, in this cases is when we need to generate a clipping path. Clipping paths can only be vector objects, but the clipped objects can be either vectors or bitmaps. First we need to create the two shapes that are going to be clipped. Use the pen tool to draw something like this.
This shape must be less bright, so fill it with a dark red.
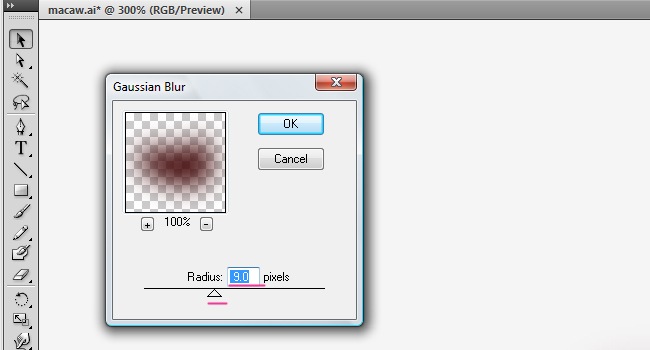
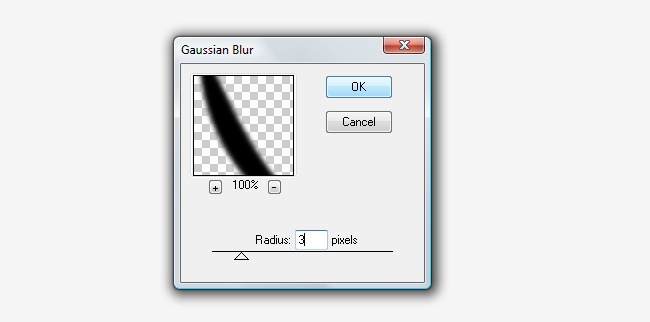
If we leave it this way, I think it will look too cartoonish, let’s add a blur filter to make it more realistic. Please go to Effect>blur>Gaussian blur.

Around 9.0 it’s a perfect value to reach what we are looking for.
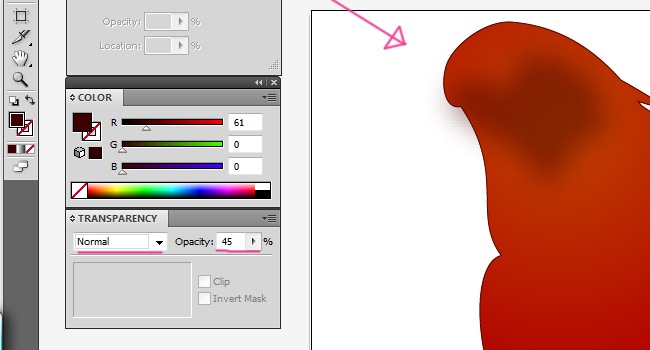
OK, the gradient is fine, but is noticing beyond the necessary, reduce the shape’s opacity to 45 % at the transparency window. (Window>transparency).

Now our shape should be looking like this.
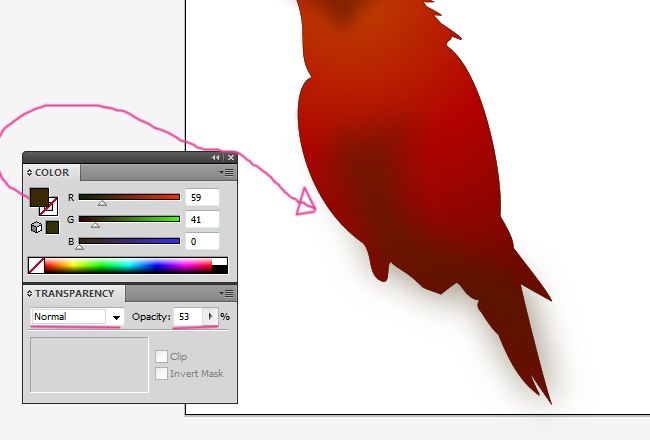
Then, we draw the following form using the pen tool. Fill it with exactly the same color than the previous shape we did.
And then we repeat the process, enter a Gaussian blur around 9.0
And now, reduce the opacity to 53 % and you will get something similar to this.
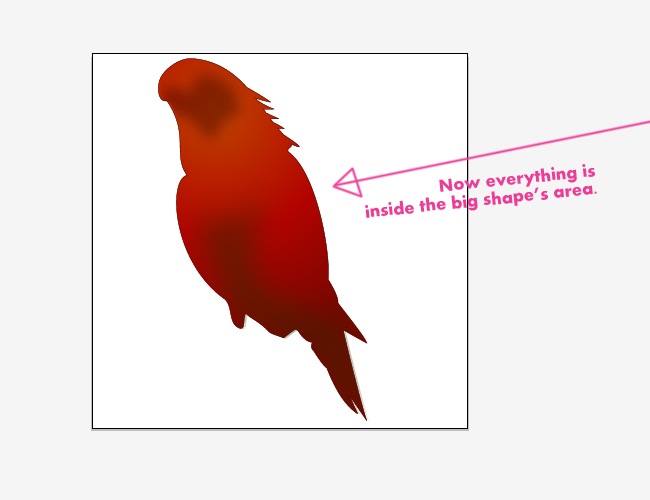
As you can see, there is a problem with this two shapes, both are going beyond the larger shape’s edges, so this is the moment to create the clipping path. The clipping path in this case is going to be close the macaw’s original shape, take the pen tool and trace the path.
We don’t make it exactly like the original shape so we can leave some gradient pixels outside the area generating subtle shadows.
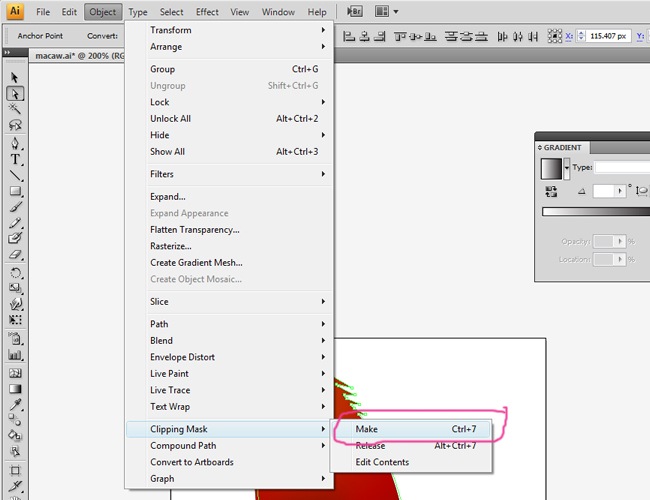
This is where the magic happens, select the two blurred shapes and the clipping path, then go to Object>clipping mask>make and voila.
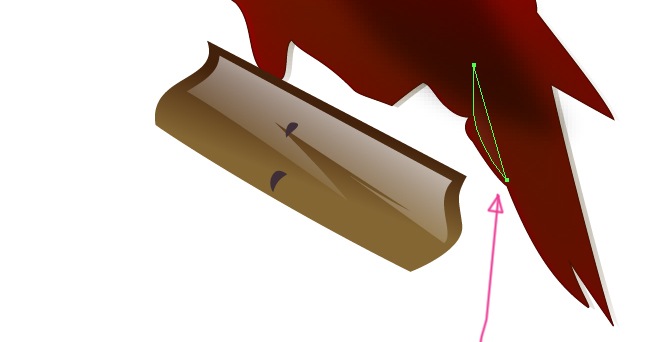
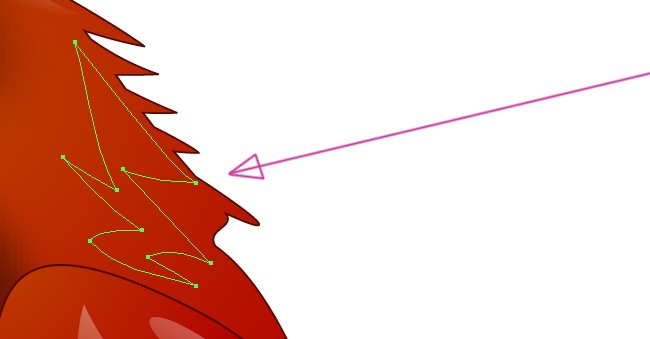
6. The Wooden Stick
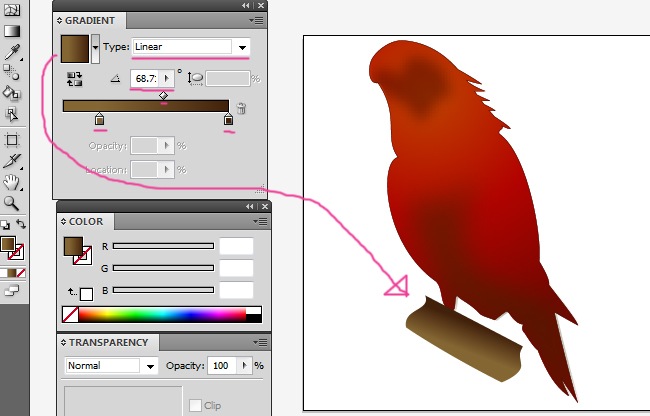
Our macaw will be standing on a wooden stick, staring at every person that walks in front of him. The initial wooden stick is composed by a simple gradient shape with no stroke.
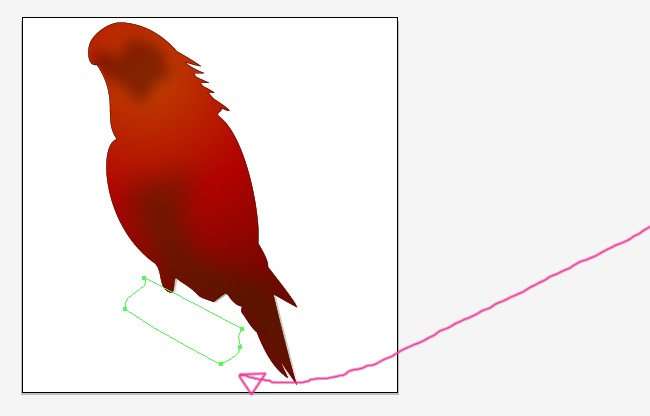
Do not use bright colors, a controlled color palette works perfectly on realistic works. Use two colors to generate the gradient with one of the two inclined closer to the other, the values must be linear and 68.7 angle.
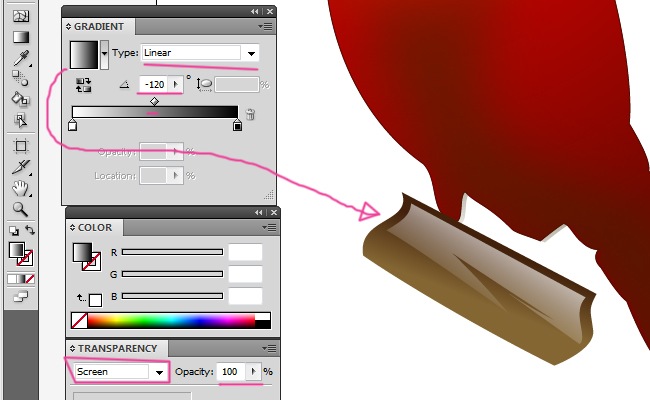
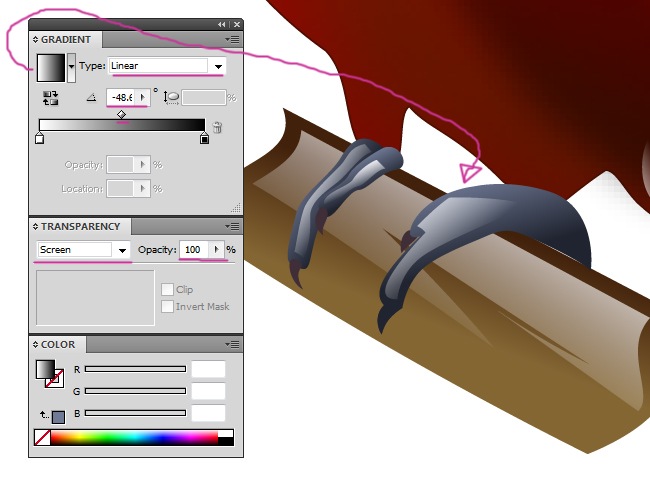
We need to add some extra volume. Let’s draw a new shape in top of the wooden stick that will help with this volume that we are looking for.
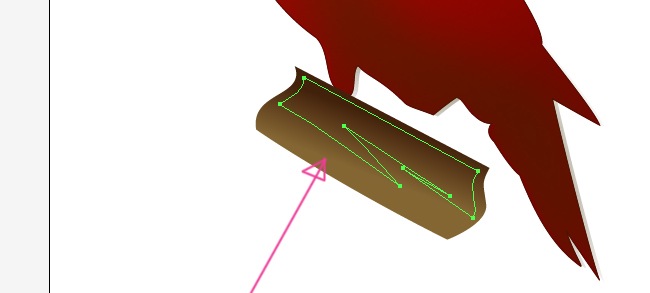
This shape is going to have a black and white gradient, with linear type and a –120 angle, also it’s important to change the blending mode to screen at the transparency window.
7. Adding more details
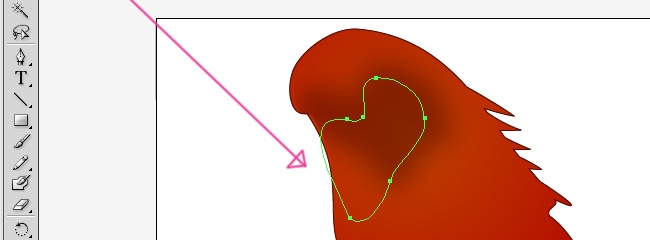
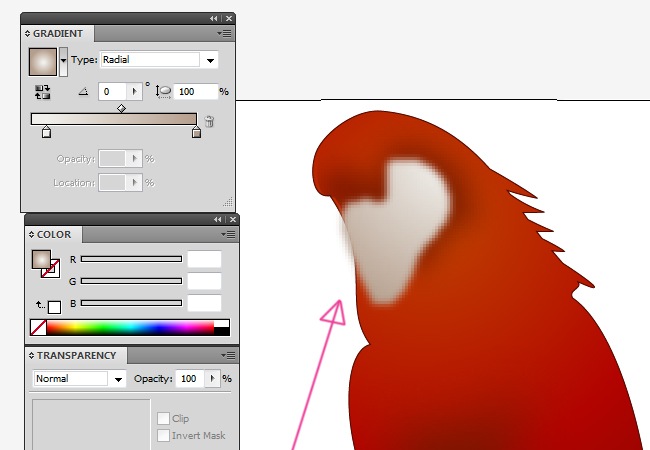
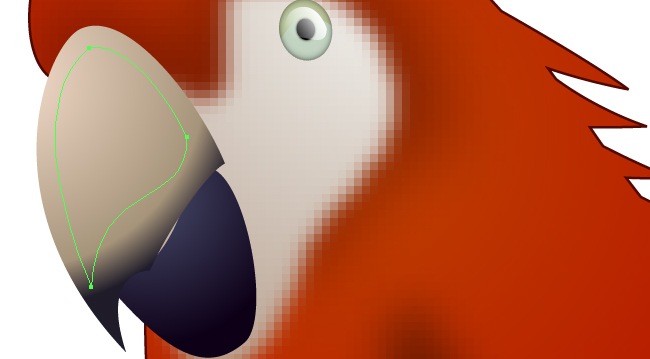
The rest of this tutorial will guide you through the details that gives the realistic touch to our icon. The next shape is the with area of the macaw’s face, use the pen tool to draw it.
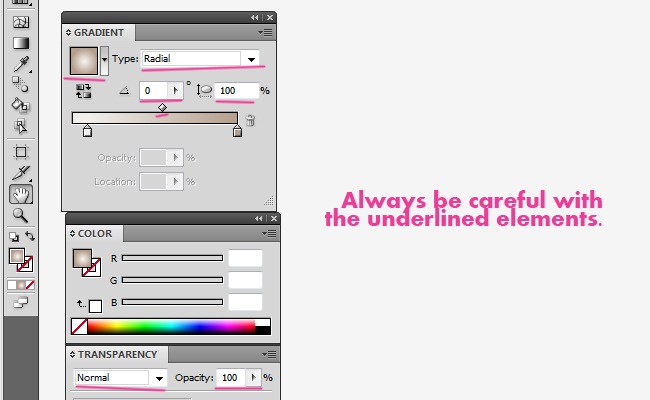
The next thing to do is the gradient. Although it should be white, it’s better to apply a bit of color to enhance the volume, define a radial type gradient with a 0 angle and 100 aspect radio.
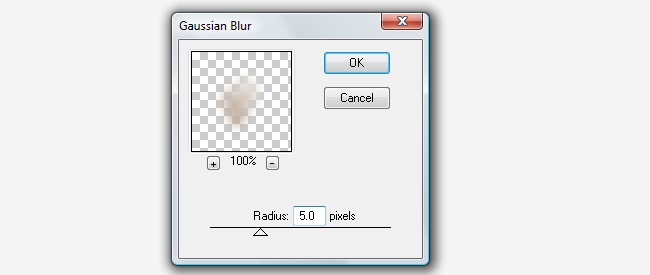
This shape needs some blur. Enter a Gaussian blur with a value around 5.0, maybe less.
Now you will have a result closer to this.
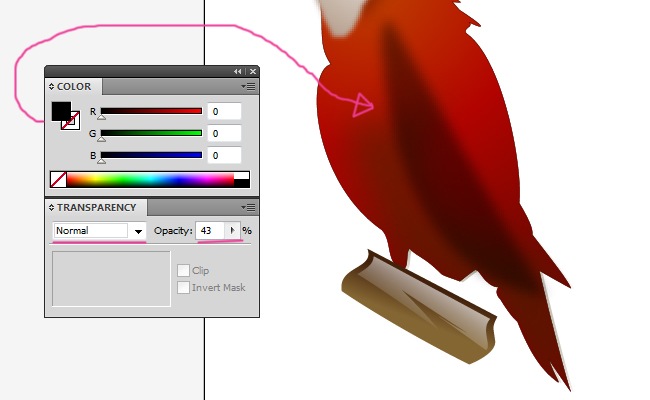
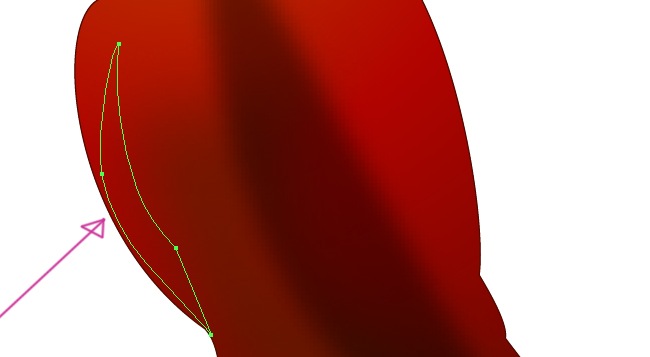
Now a wing insinuation, draw a shape that resembles a wing and fill it with a crimson tone, then go to Gaussian blur and enter a value around 3.0. Finally, adjust the opacity at the transparency properties to 43 %.
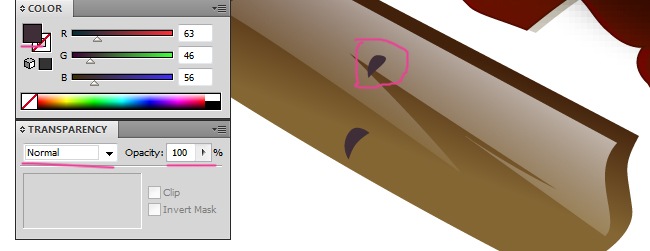
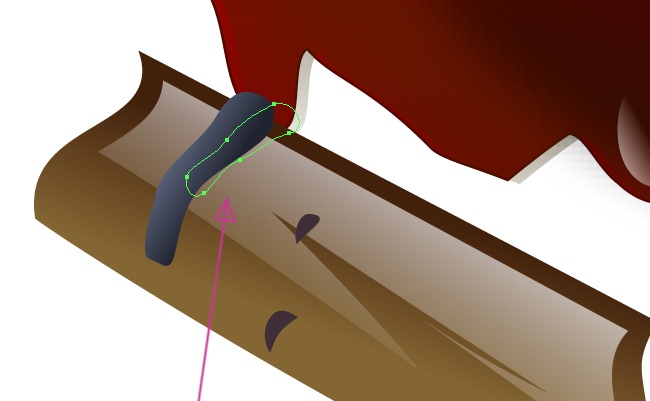
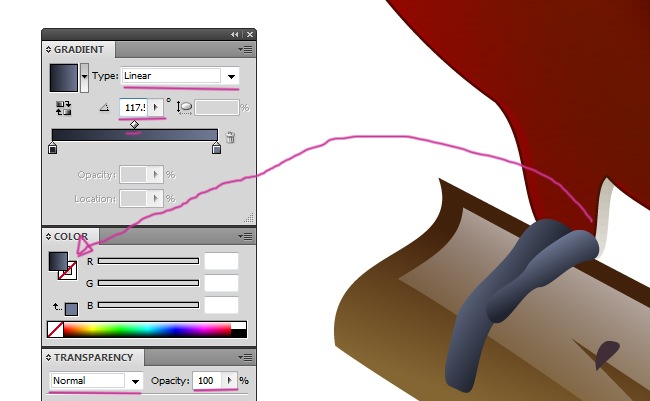
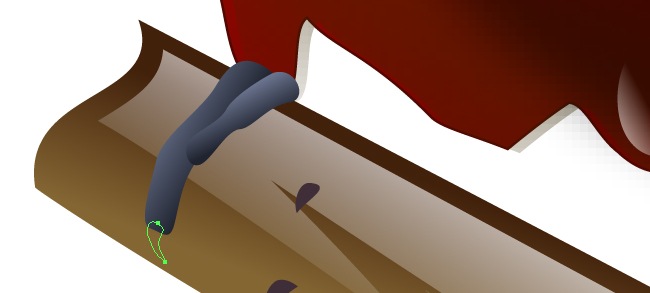
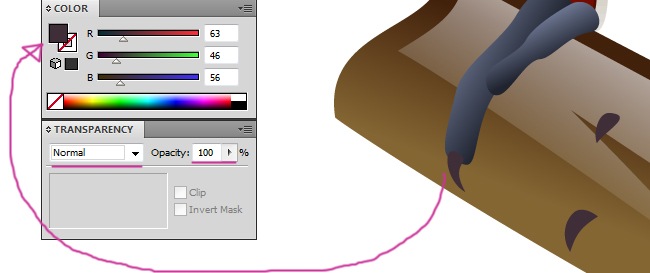
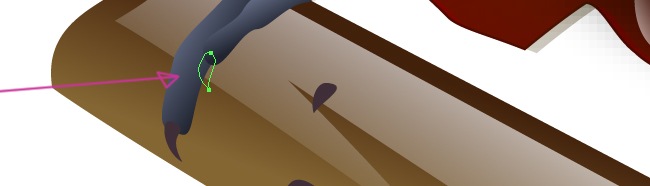
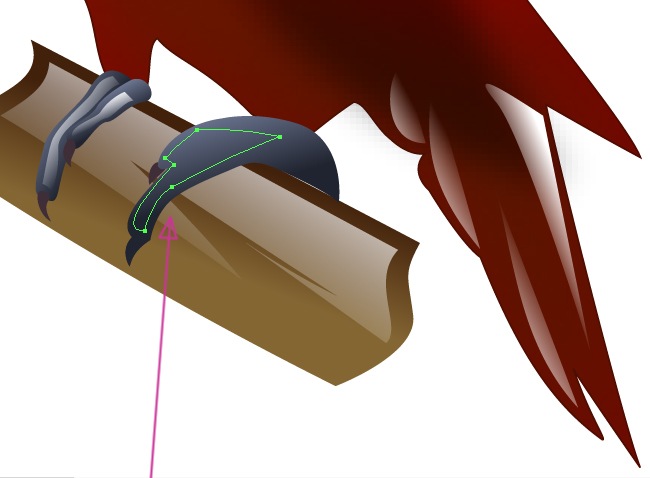
The next step is the paws. Very simple thing, just draw a small shape with the pen tool and fill it with a dark color.
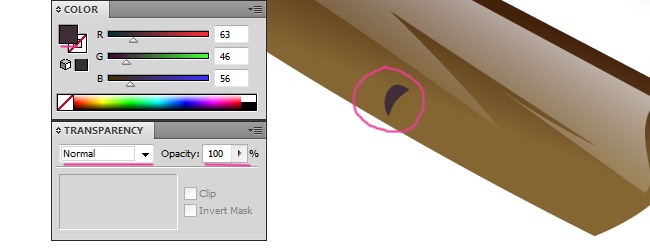
Repeat the process to create another claw of the paw with the same fill.
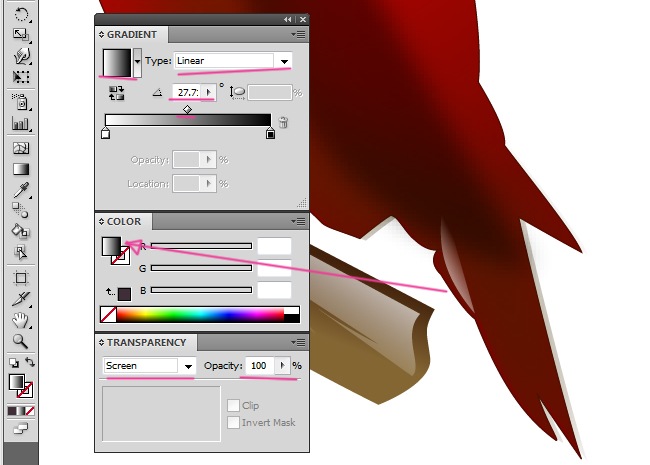
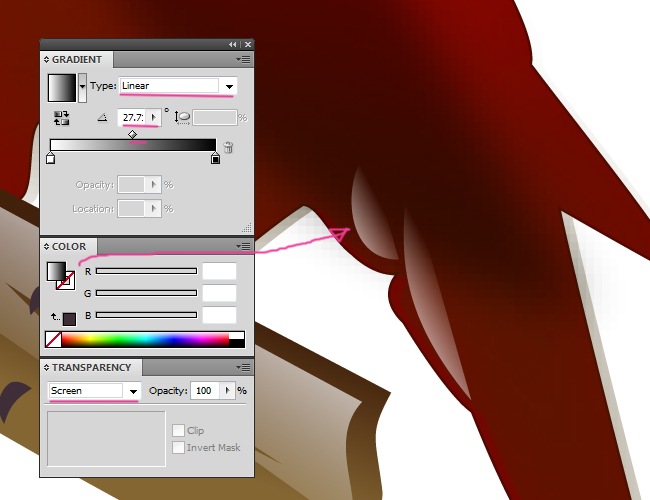
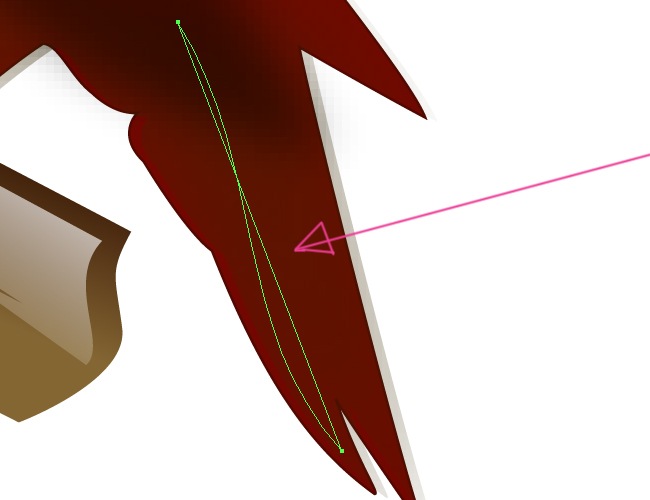
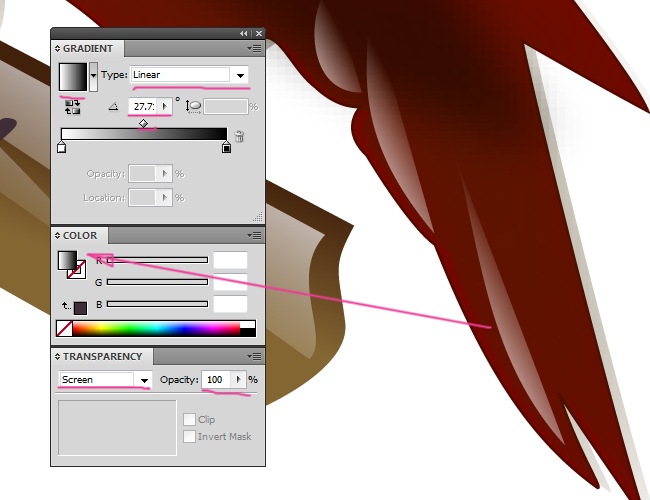
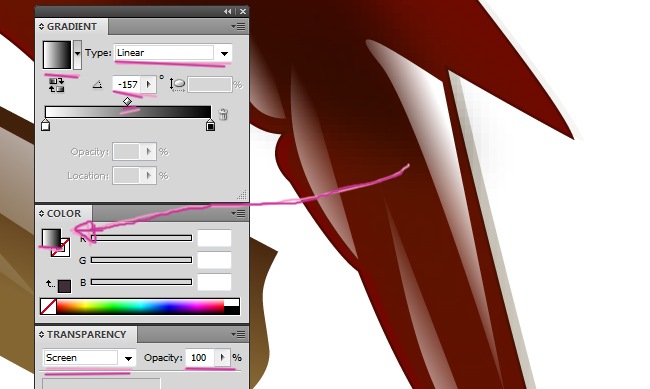
Now we are going to start with the feathers, draw it with the pen tool and fill it with a black and white gradient, 27.7 angle and linear type, also change the blending mode to screen.
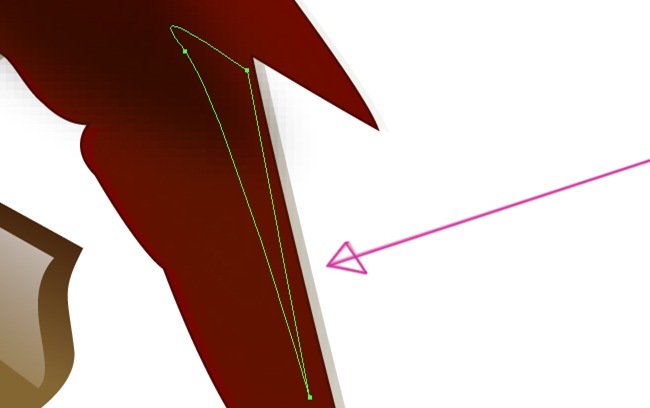
The next few shapes are just a constant repetition. Draw it and fill it just like you did with the previous object.
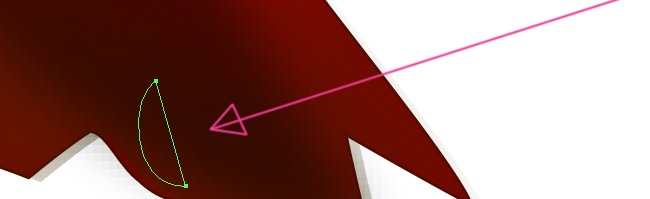
And keep on doing, the next shape is identical in terms of fill properties.
The final shape changes its angle, switch it to –157, leave the rest exactly like the others.
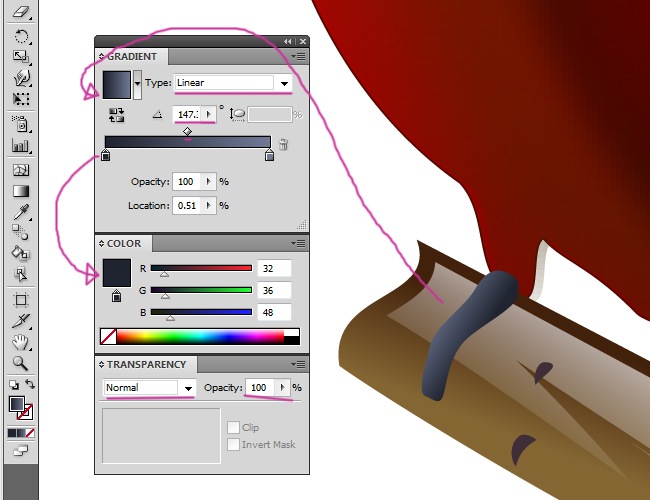
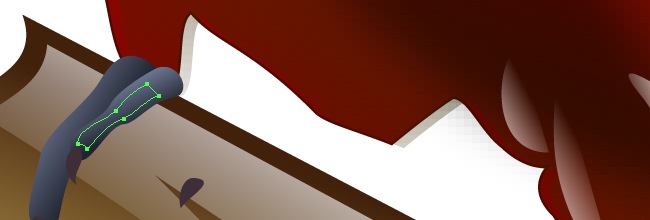
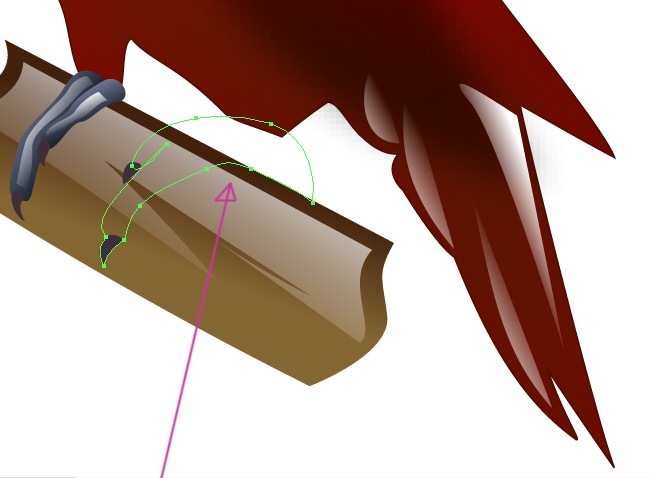
Let’s complete the left paw of our macaw, this requires around 4 steps to be completed. First select the pen tool to draw the primary shape.
Now fill it with a gradient and adjust the parameters to linear and 147 angle.
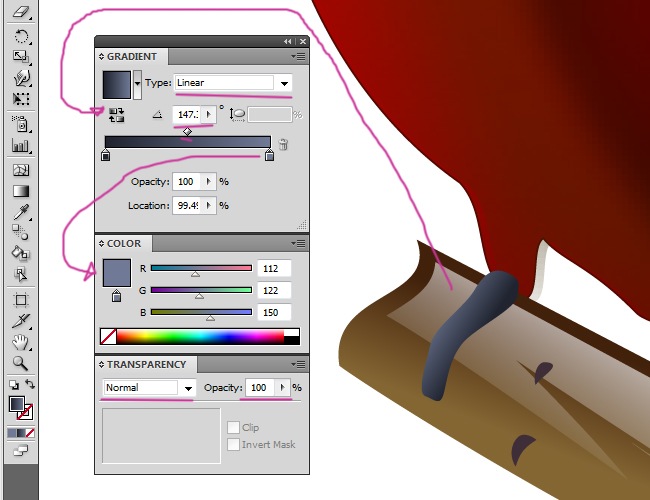
The next shape is similar but the angle changes to 117, all the rest is the same.
Now the claws, easy to do, simple trace with the pen tool and solid fill color.
The same thing for the next claw, it’s just a matter of repetition.

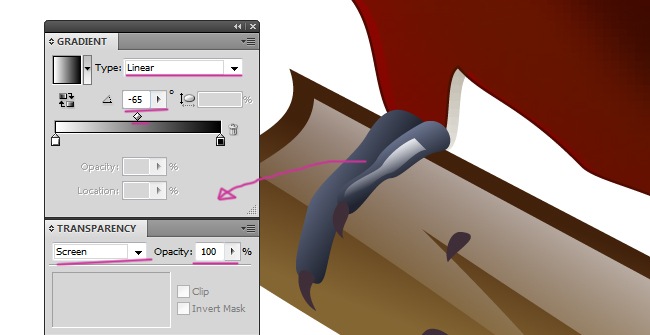
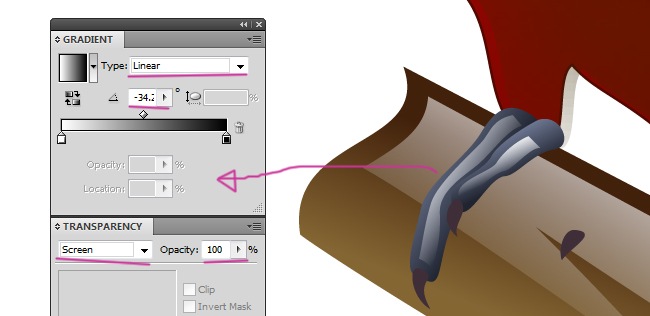
Now a few highlights, trace the first one with the pen tool.
Regarding the filling, it should be a black and white gradient, linear type, –65 angle and screen blending mode.
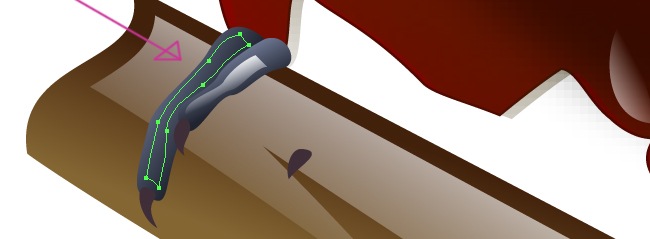
The other highlight is similar, the only thing that you need to change is the angle, which now should be –34.
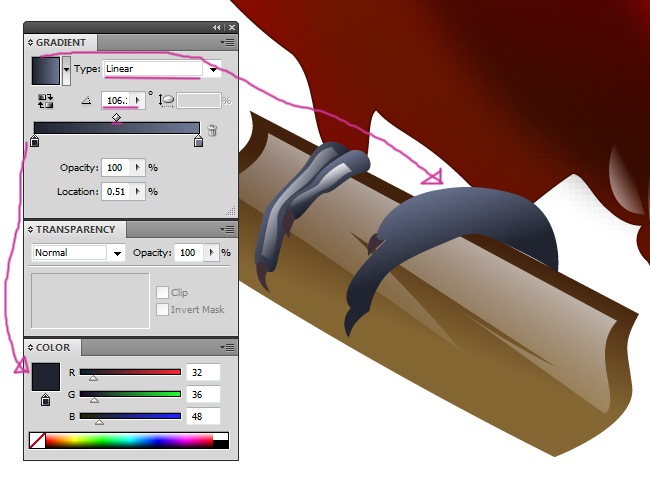
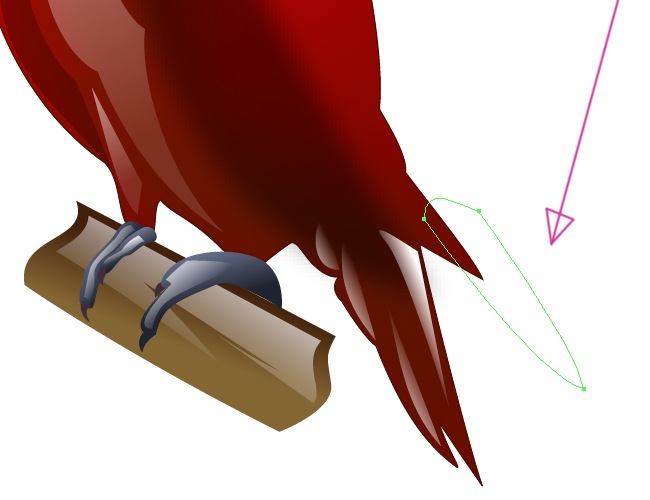
To make the right paw, first, trace the shape using your pen tool.
And now, fill it with a gradient with the following parameters: Linear type and 106 angle.
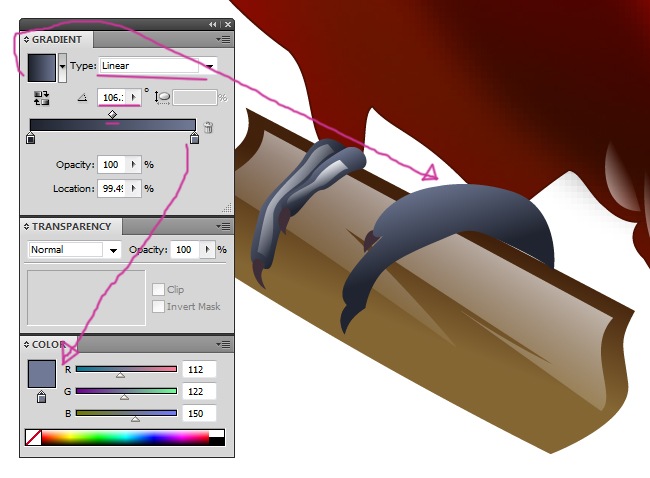
Proceed drawing an inner shape that will define the highlights, remember to use the pen tool to fulfill this purpose.
To generate the fill, use a black and white gradient and adjust the parameters to linear, –48 angle and screen blending mode.
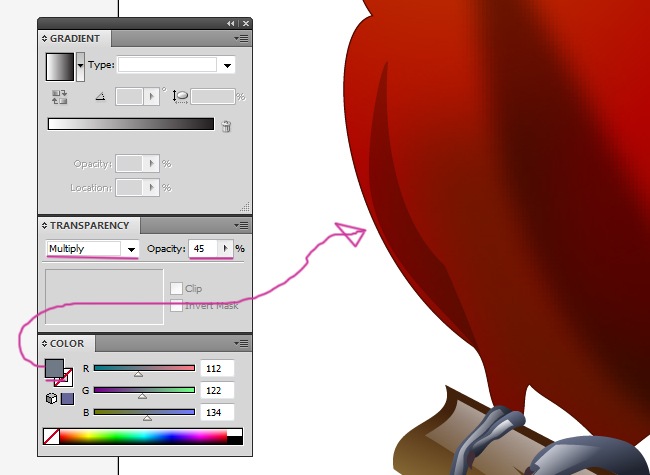
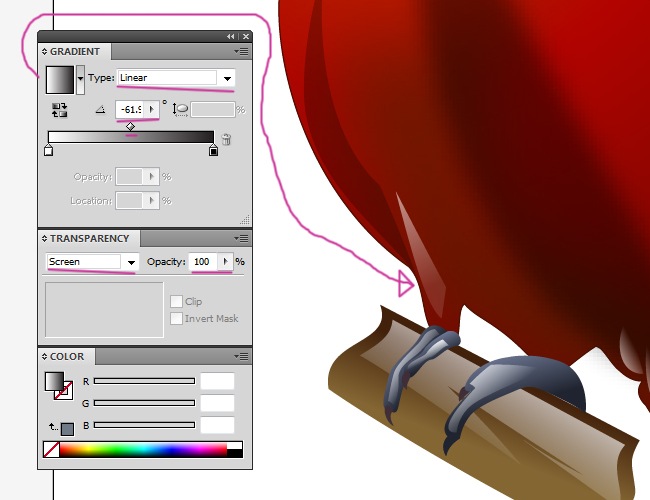
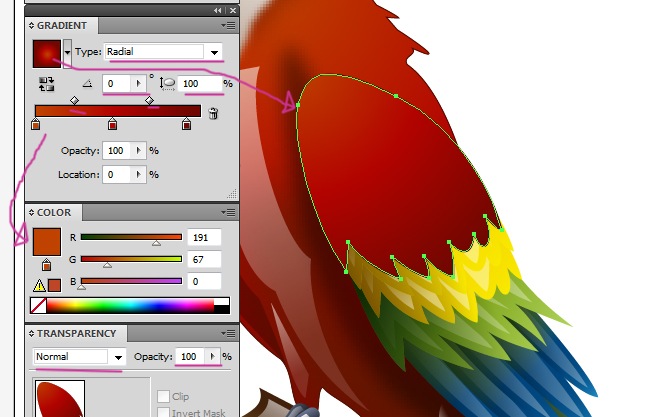
Let’s go to the body and draw a large shape at the left side of our macaw.
Fill the shape with a gray tone and adjust the blending mode to Multiply, also reduce the opacity to 45 %.
Keep it up, our macaw is looking better and better, go and grab a bag of snacks and then we continue. OK, now we will draw a highlight shape near the latest object we did.
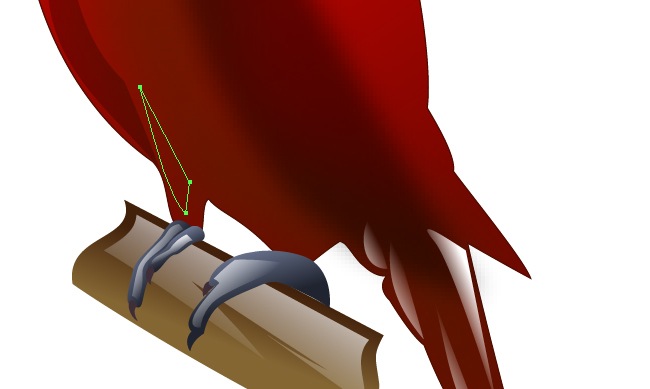
As we’ve been doing with the previous highlights, use a black and white gradient, linear type and –61 angle to fill the shape, then switch the blending mode to screen.
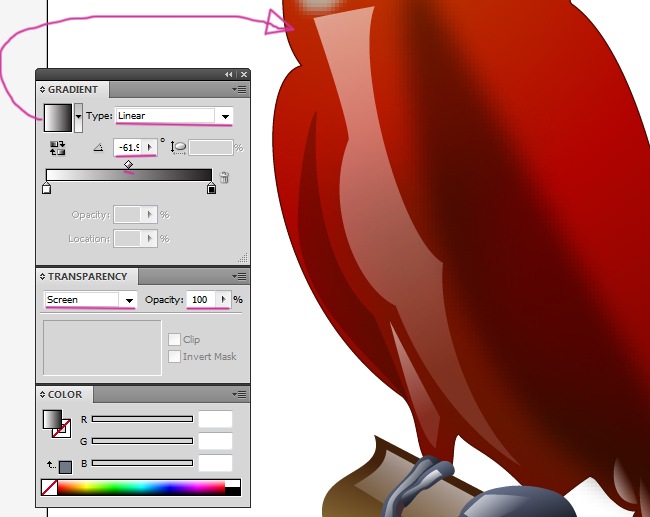
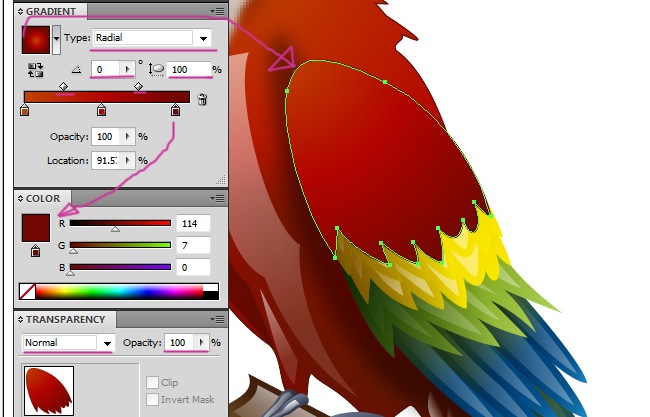
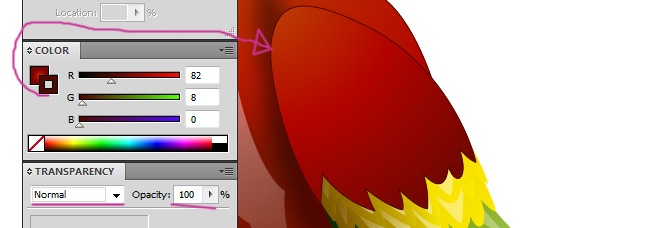
The next detail is important because it’s a large shape covering a considerable part of our macaw’s body.
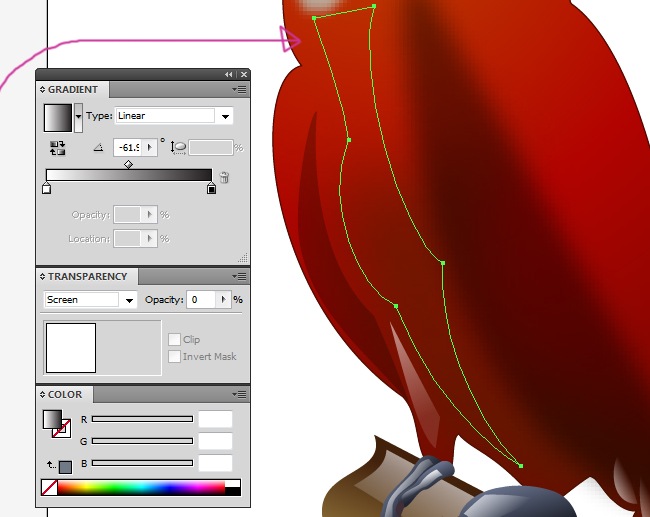
No science at all regarding the fill, just leave everything as the previous fill we used.
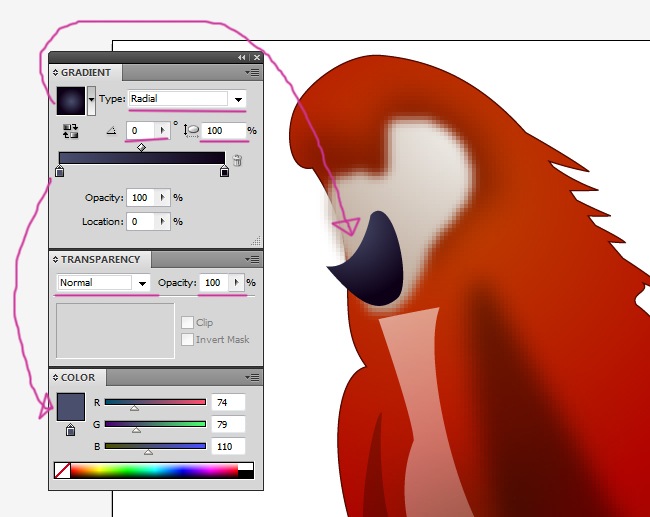
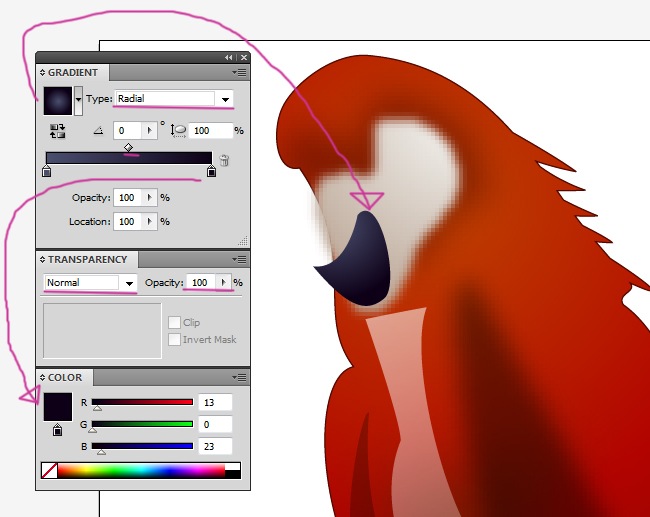
Now we are moving to the macaw’s beak. The first step we must take is to draw a dark shape that will be the lower part of the beak.
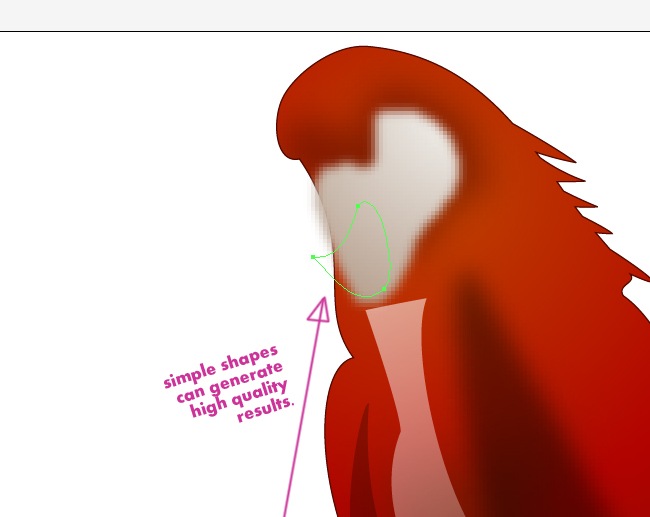
We must place a dark fill inside this shape, we suggest to use gradients instead of plain colors.
The top beak has an extra element concerning the filling. Before that, grab the pen tool and draw it.
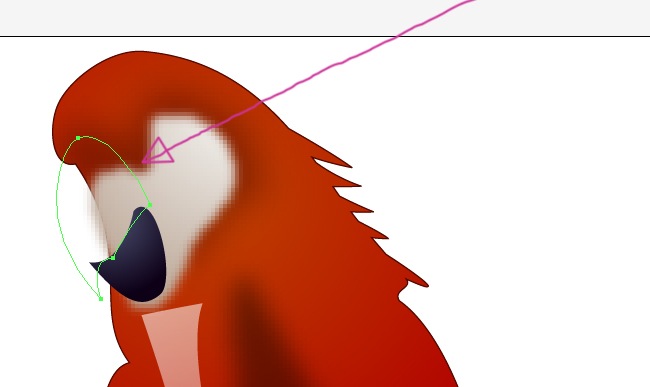
Pay attention to the following part. We are filling the object with a 3 color gradient, radial type and 100 % aspect radio.

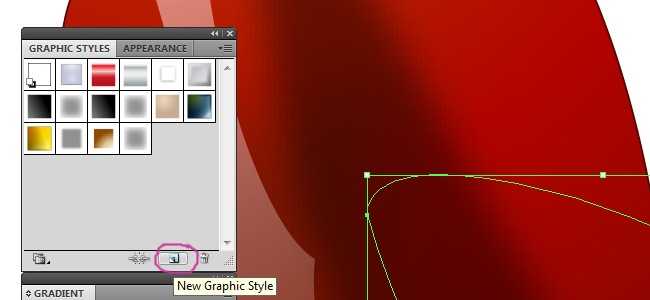
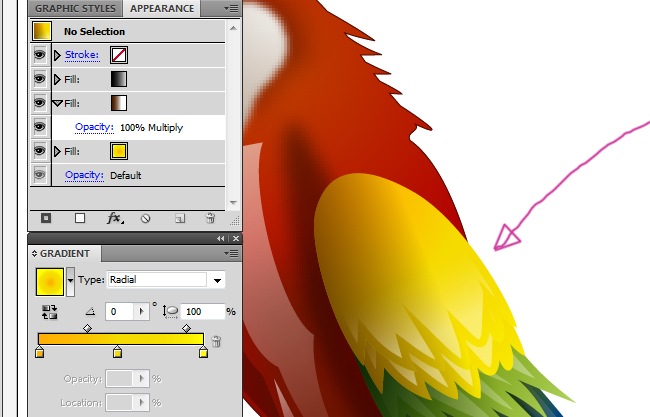
8. Implementing graphic styles
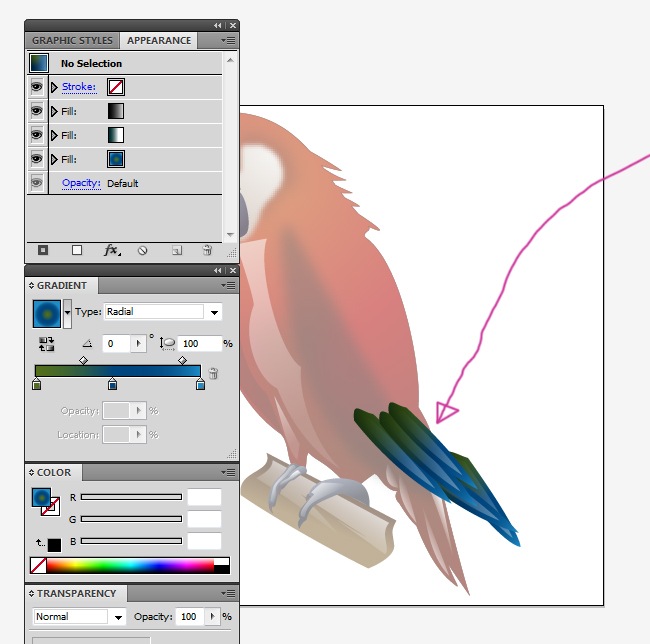
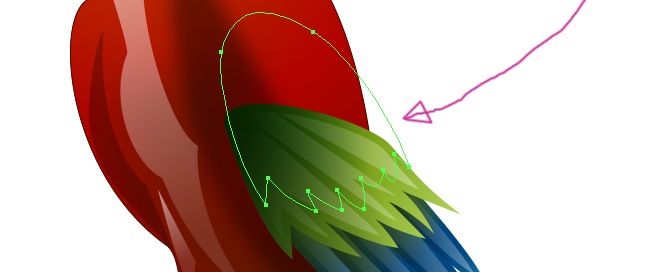
I think it’s time to begin with the feathers. It’s an easy process that leaves lovely results, for start, let’s draw the first feather using our pen tool.
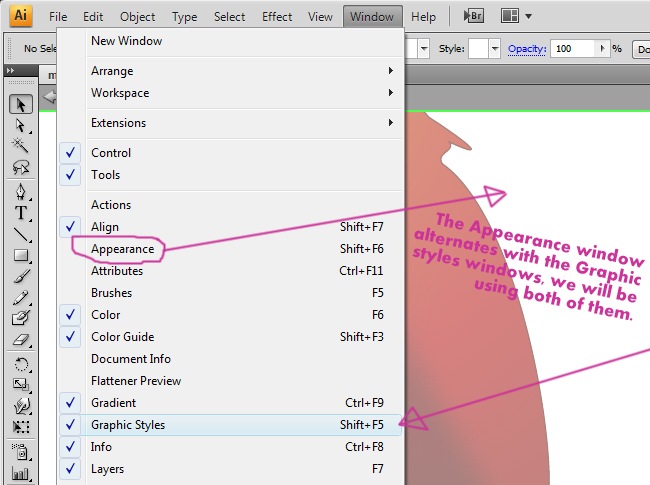
As we saw in the photo references, the feathers are full of color and are the iconic element of a macaw. Because of that affirmation, we are going to apply 3 color radial gradient. But that’s not it, we are going to use the graphic styles, an option that allows to save determined object qualities for use it at anytime. Go to Window>Graphic Styles, that will unlock the window so we can start working on it.
OK, now click on the new graphic style button, then switch to appearance to start editing it.
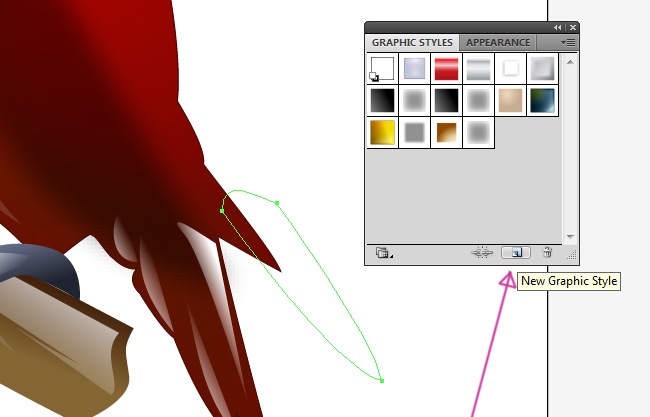
Click on the add a new fill button.

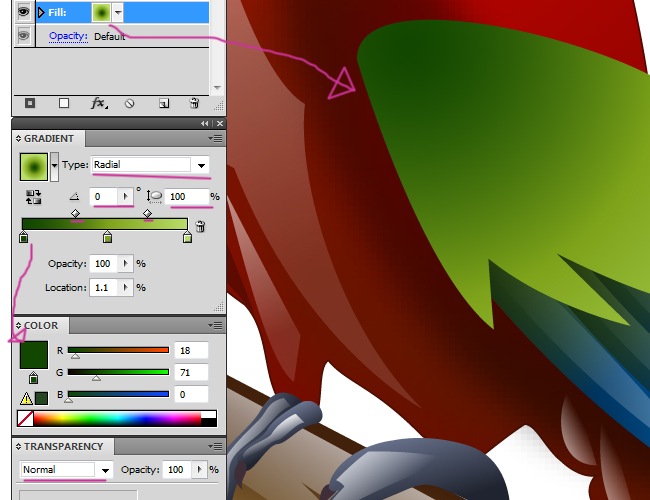
Now we need to start adjusting the gradient values until you get a result closer to this.
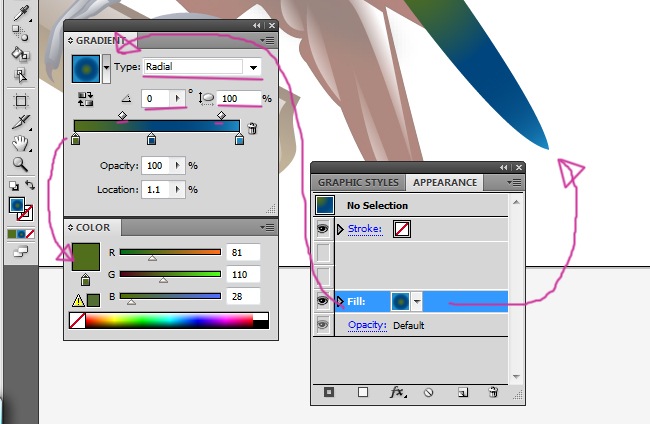
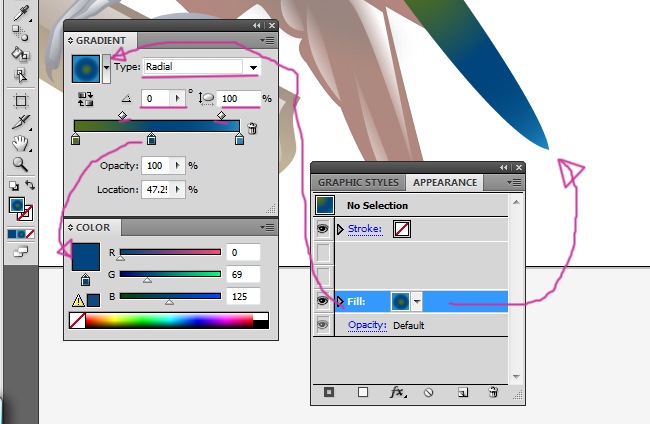
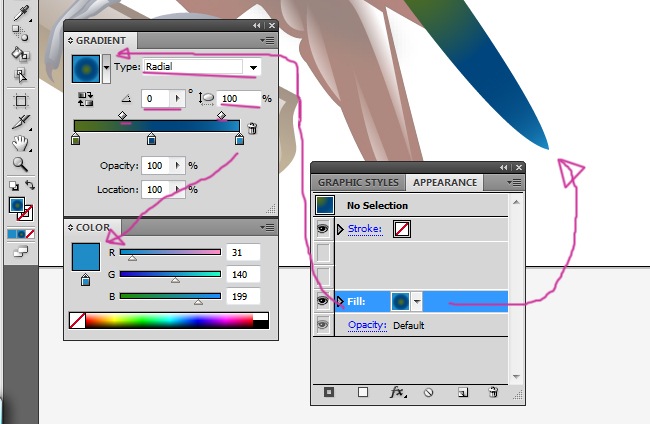
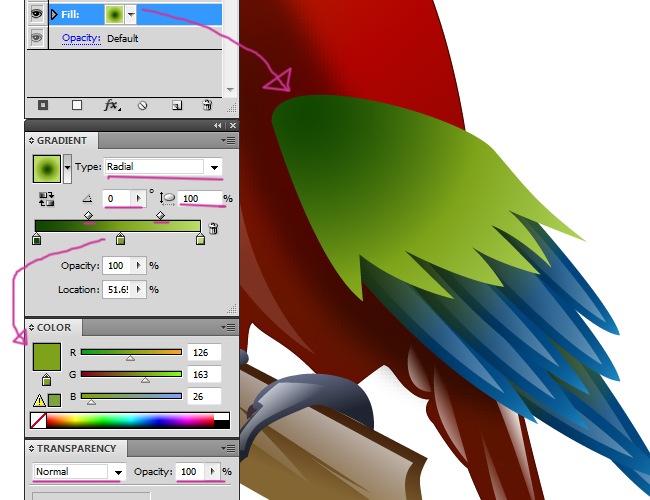
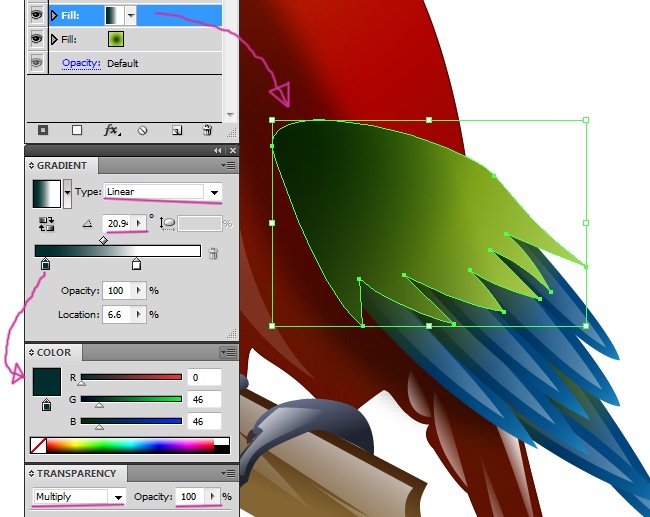
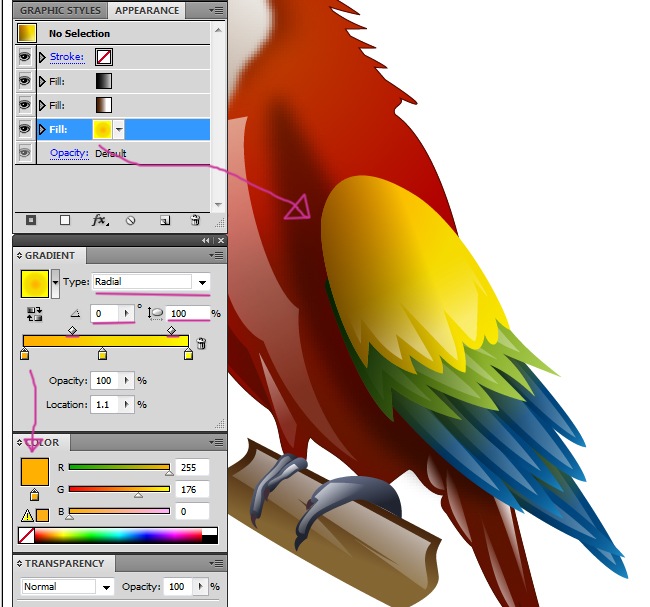
That’s the first fill of our graphic style, now let’s add another in order to continue.
This next fills uses a 2 color gradient, linear type, 20.9 angle and multiply blending mode.
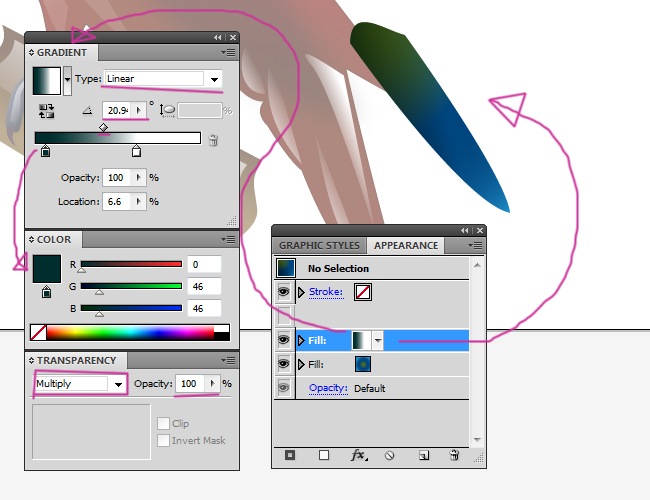
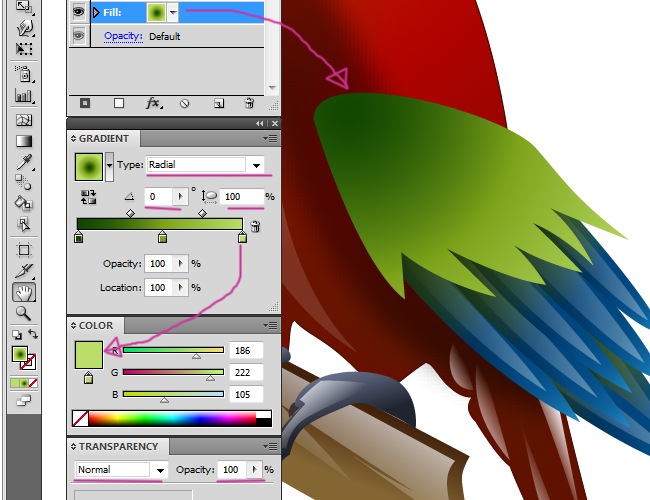
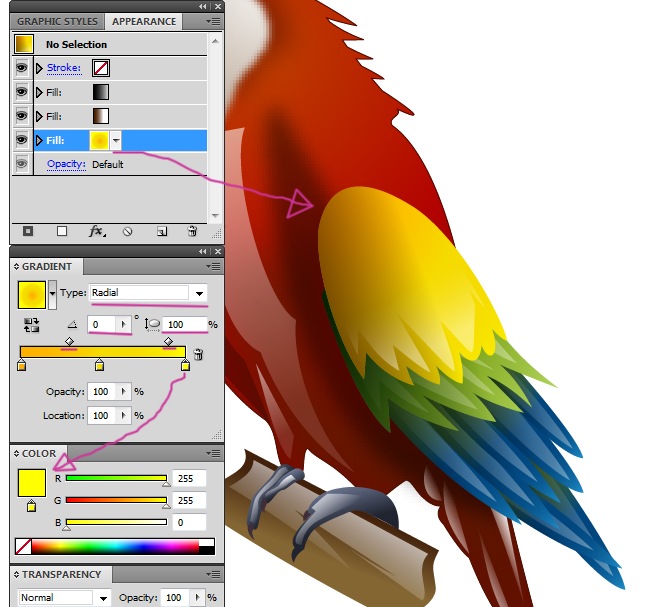
OK, the last filling element will have an effect that will help to generate a highlight, but first we are going to create the basic filling, so add a new one.
This will be a black and white filling with the following parameters: Linear type, 3.0 angle, screen blending mode and 42 % opacity.
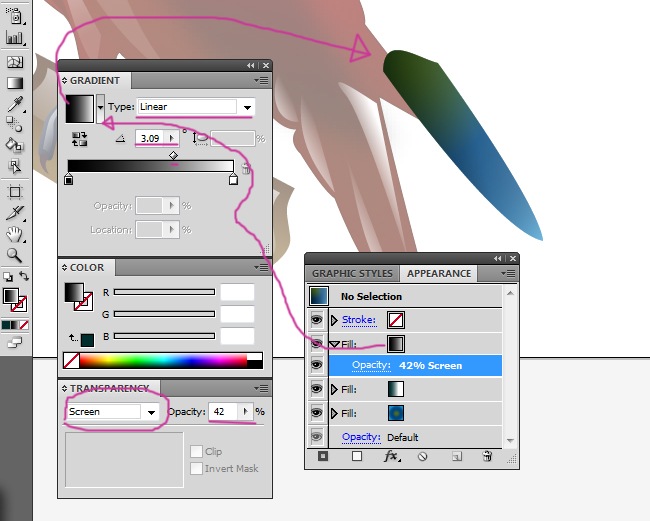
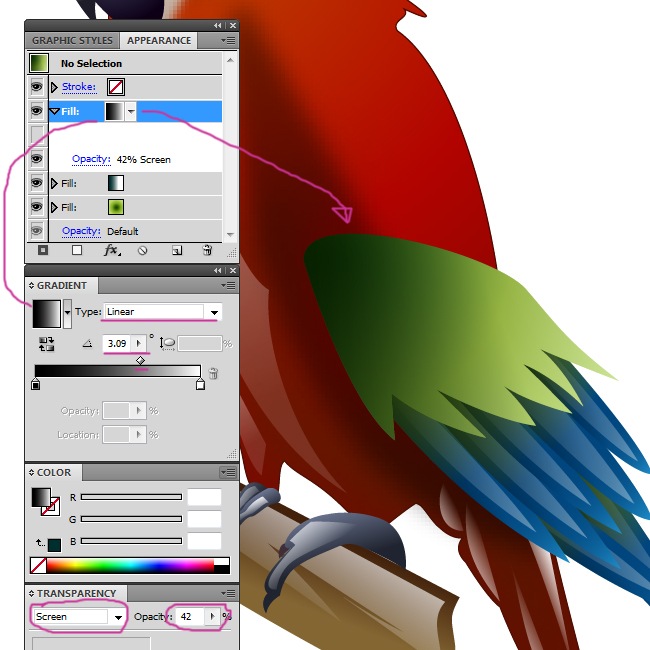
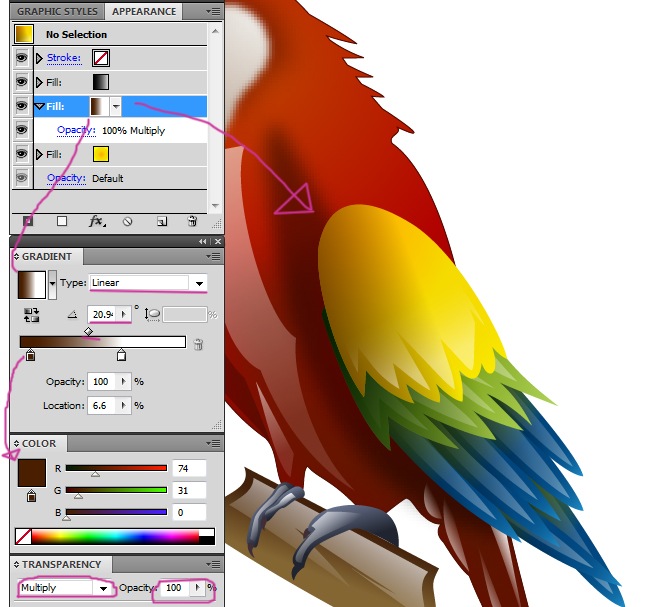
To add the effect, click on the icon located at the right side of the new fill icon..
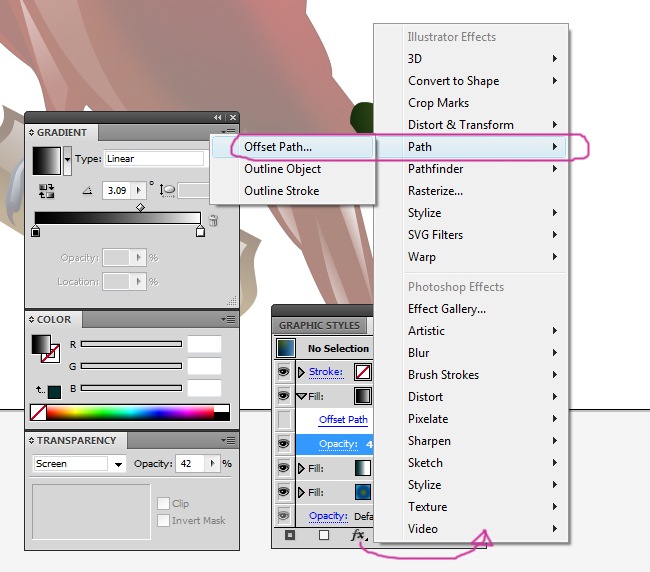
Enter a –2.3 px value, joins>miter and miter limit 0.
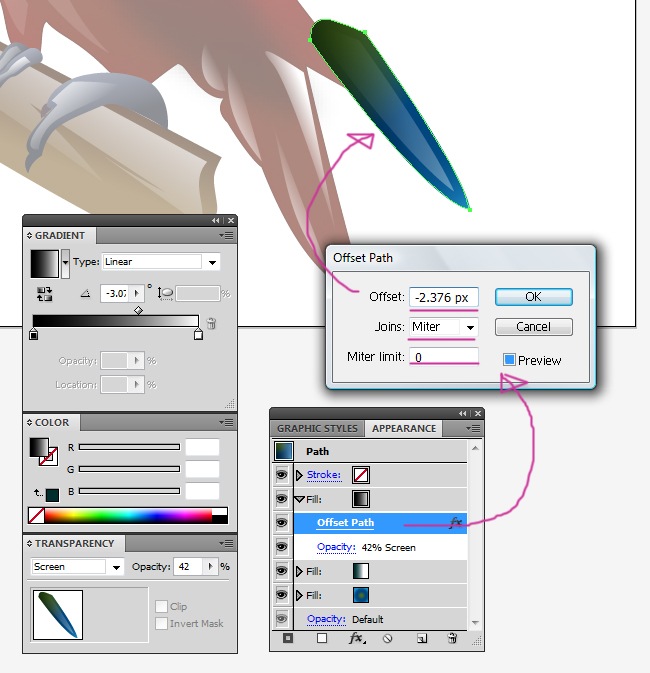
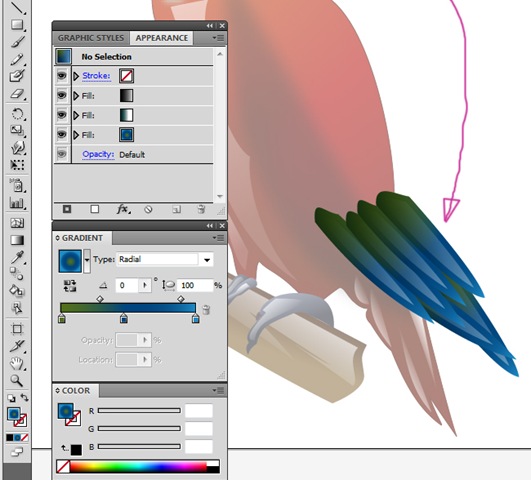
We are done with the first feather, this one surely took you some time because it was the first, the rest of the process will be faster. Right now the macaw must be looking similar to this.
We don’t need to do this process with all the feathers, only with one. Trace the next feather and simply apply it the graphic style, it will look great.
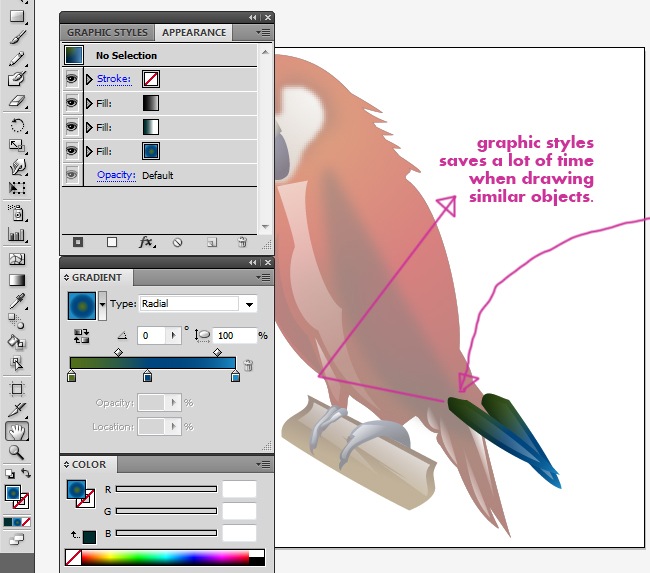
And so on, you don’t need much enforce to complete the first set of feathers, just draw them and then apply the graphic style.
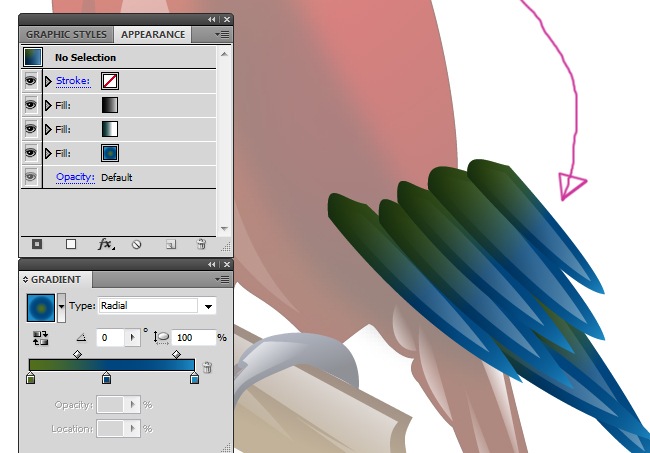
This is the beauty of graphics software such as Illustrator, that provide you with almost all the necessary tools for you to focus on the design instead of the delivery times, imagine how much time will take to make feather after feather a few years ago.
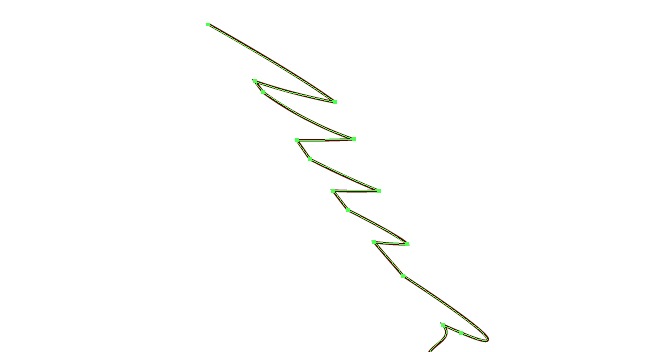
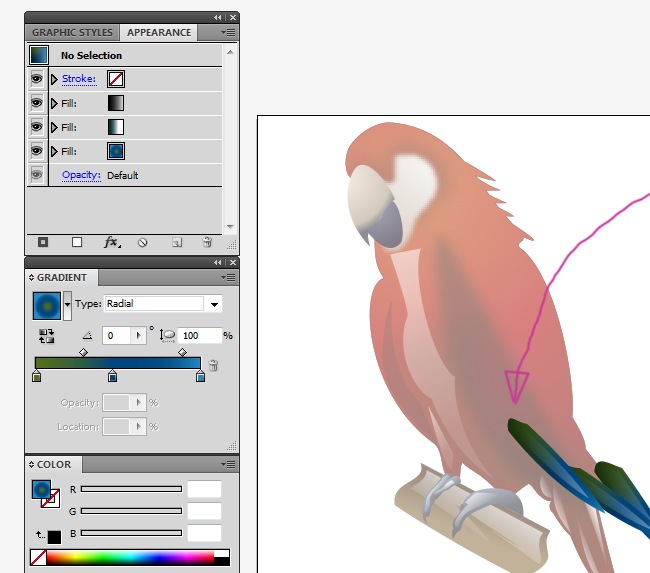
I think I’m going to order a pizza so I can eat while we are finishing our macaw, maybe pepperoni or teriyaki. The next set of feathers is easier to do because it’s going to be a single shape, for start, choose the pen tool and draw something like this.
Remember that when you click on the last anchor point while you are drawing, you can go from curved to straight turns.
Now let’s play with the graphic styles. We are going to create a new style for this feathers, the difference is that one single style will define all of this feathers.
After creating the style, we must proceed by adding the first filling element.

The first filling element is going to be a 3 color gradient, radial style and 0 angle.
The first fill is ready, the next element is going to be a 2 color gradient, linear type, 20.9 angle, and multiply blending mode.
Proceed by adding the last fill, which is going to be a black and white gradient, linear type, 3.0 angle, screen blending mode and 42 % opacity.
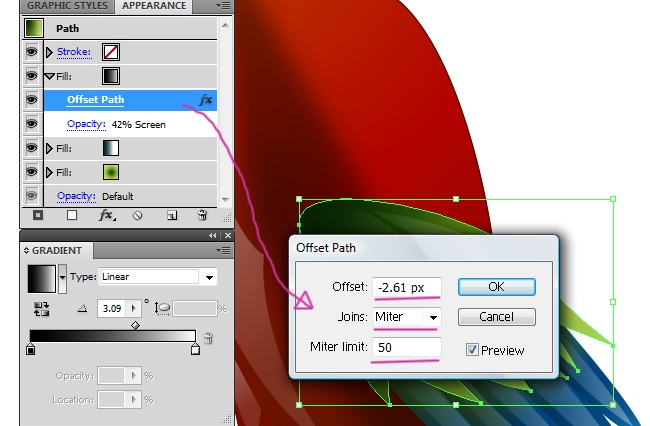
Let’s employ the same effect that we chose when we were making the blue feathers, please go to the add effect button and select offset path.

The parameters for the offset path must be –2.61 px, joins>miter and miter limit>50.
And with that the second set of feathers is ready, our macaw is looking great so far.
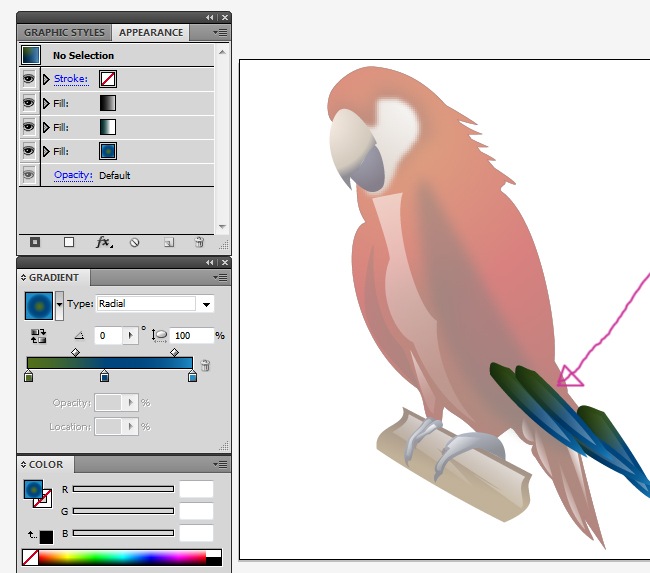
We still missing the yellow feathers, but that’s not a problem, we can make it right away. It’s a waste of time repeat the entire graphic style process, being that we only need to change one of the filling parameters, draw the object with the pen tool and then we will tell you what to do.
After this, do not create a new graphic style, simply apply one of the two he have created, preferably the one we used for the green feathers. I know, the feathers are looking green, you need to select the first filling object and modify the colors to get the result, don’t worry, it’s easy to do and you will get a beautiful set of yellow feathers.

You need to also modify the second filling object, which is the one that determines the shadows, the original style had green shadows, so you need to modify the gradient towards a dark yellow, almost brown.
Maybe we need more feathers, copy the yellow feathers (Ctrl + C) and place the copy over the original (Ctrl + F), then use the transformation tool (E) and increase the new object’s size a little bit.

Better isn’t it?, we are just a few minutes away of finishing our macaw.
It should exist a red element on top of the feathers as you can see on the photographs, that element is where the wing begins, there is no need to draw it from zero, simply copy the latest set of yellow feathers (Ctrl + C) and place it on top (Ctrl + F), then move it up and clear the graphic styles, instead just apply a 3 color radial gradient (0 angle) and a 0.33 stroke.

Hold on a few minutes, we are almost there.
Then you need to add a thin stroke line to give some extra detail to the object.

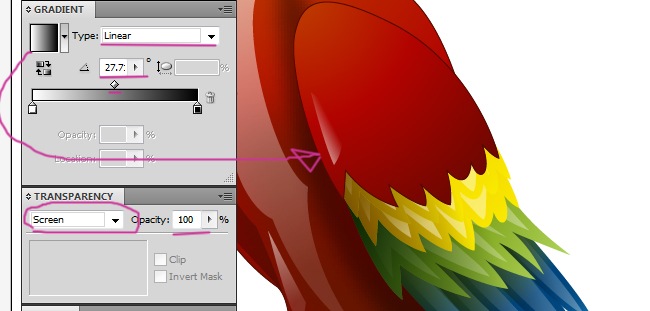
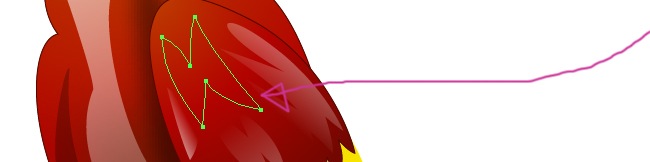
We should place some highlights over the last shape, remember that we are creating a realistic macaw, use the pen tool to trace the first highlight.
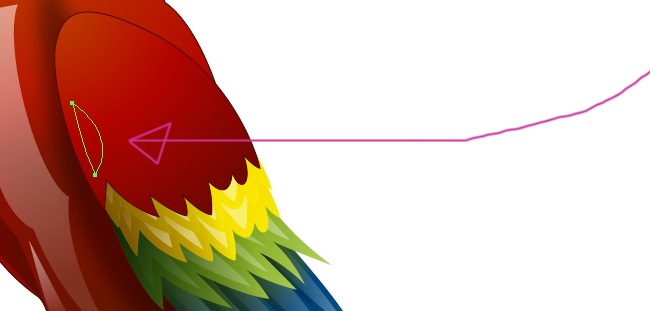
Use a black and white gradient for the fill, linear type, 27.7 angle and screen blending mode.
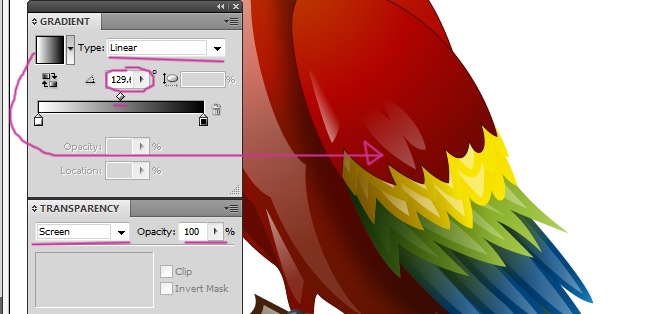
One more shape to trace in order to continue adding highlights to our macaw’s wing.

Employ the same filling properties that we used with the previous object, but change the angle to 129.
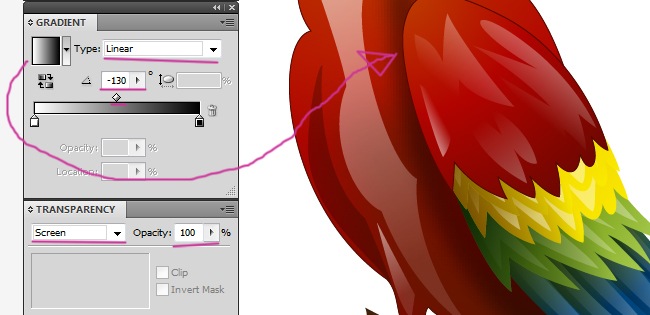
One more shape, we are almost done with this part.
Once again, fill it with the same gradient values but adjust the angle to -130.
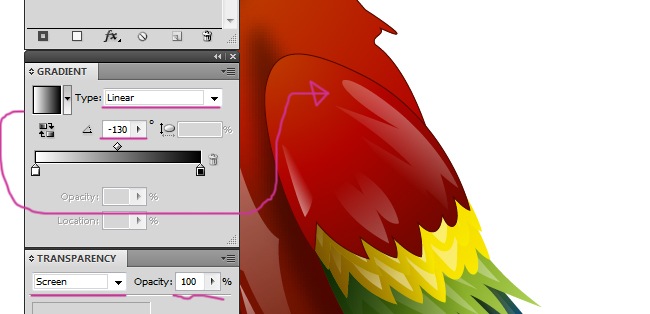
One last fill and we are done with the wing, so hurry up and grab your pen tool.
The filling properties will be similar to the previous highlights, black and white gradient, linear type, –130 angle and screen blending mode.
9. Final Touches
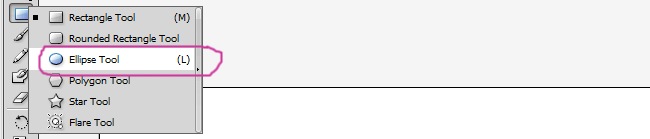
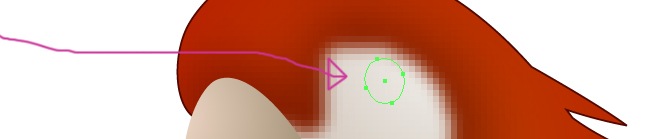
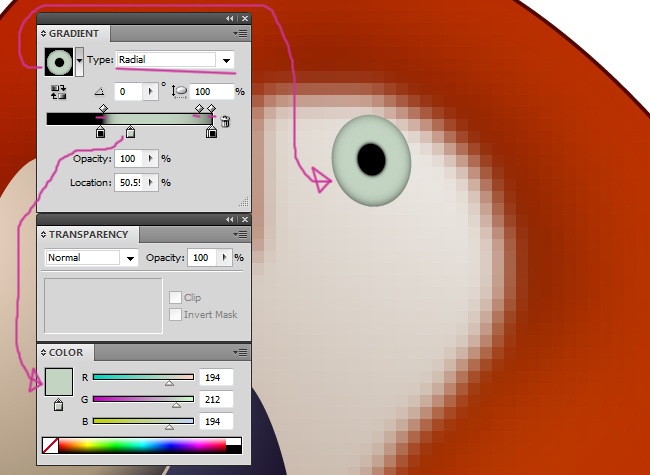
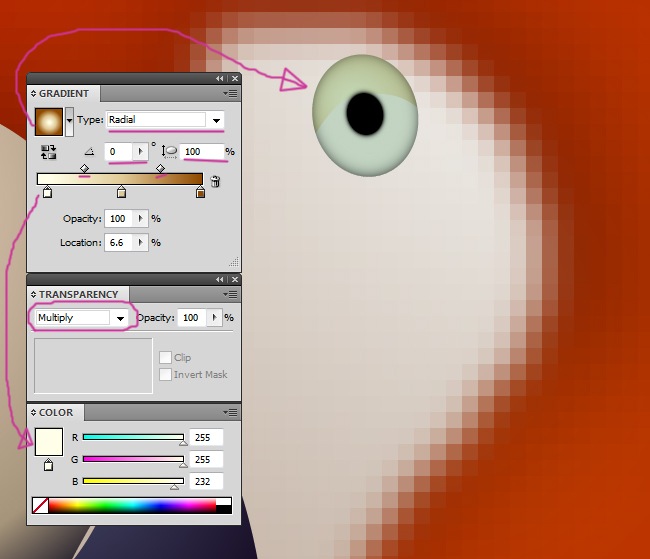
It has been a long journey and now we are reaching the end of the road, a few more things and we are done with our macaw. First we are going to create the eye, this will take a certain amount of steps. First, we are going to use the ellipse tool to draw the basic shape.
We will be using a single gradient to create almost the entire eye. The gradient is going to be after the following parameters: Radial type, 0 angle, 100 % aspect radio, 4 color gradient.
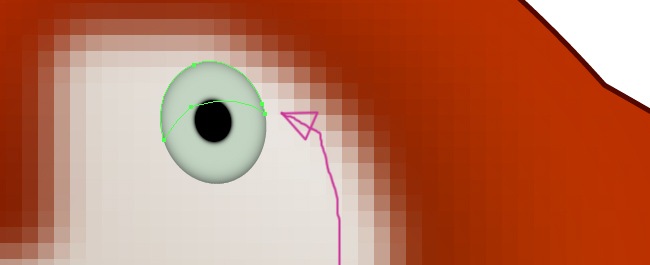
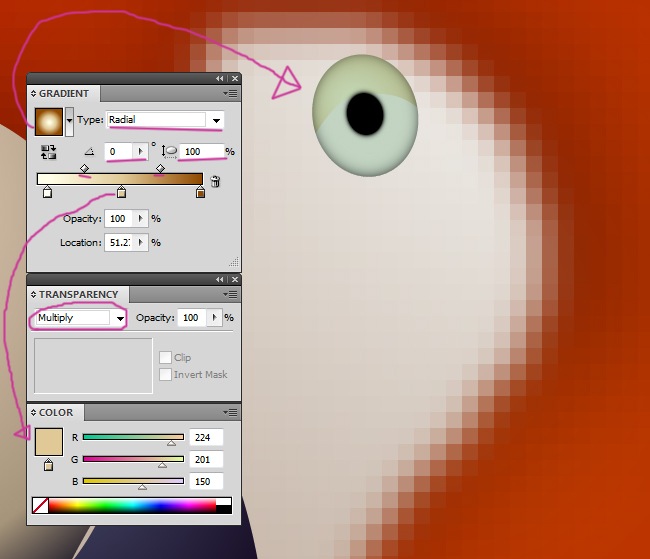
Gradients are great filling tools when used appropriately as you can see on this example. Let’s use one more gradient to complete the eye, we are adding some sort of glow on top, start by drawing the shape.
The gradient of this figure will be composed by a 3 color basis, radial type, 0 angle, 100 % aspect radio and multiply blending mode.
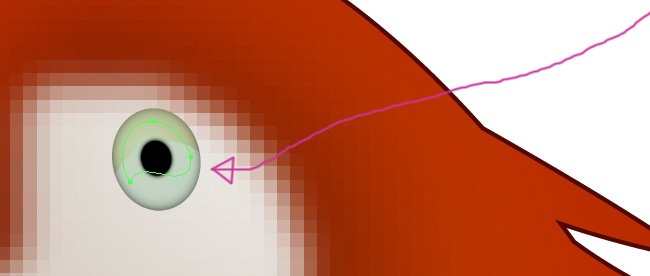
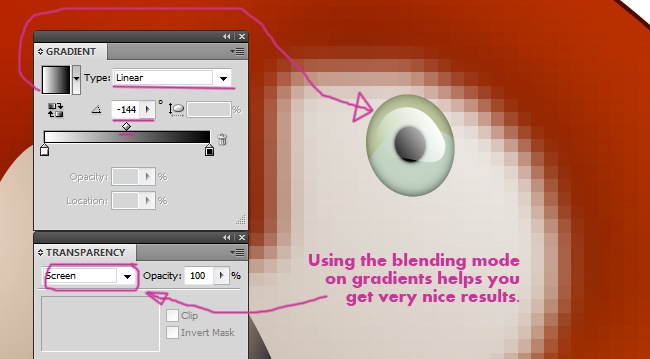
Maybe a final glow will make even nicer this eye, draw an irregular shape on top of the eye using the pen tool.
Let’s fill it with a black and white gradient, linear type, –144 angle and screen blending mode, it will look great.
The beak needs also a subtle highlight to outstand, so let’s do it.
Now fill it with the same black and white gradient that we’ve been using, linear type, –27 angle and screen blending mode.
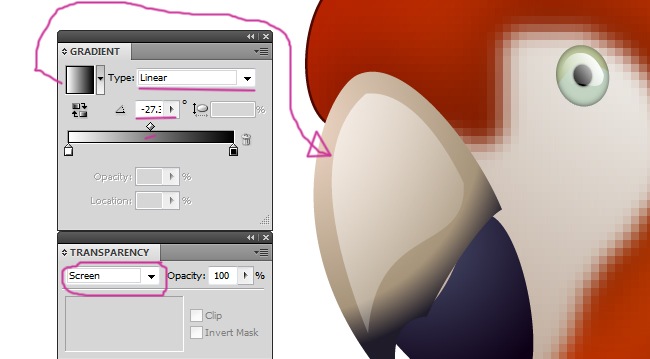
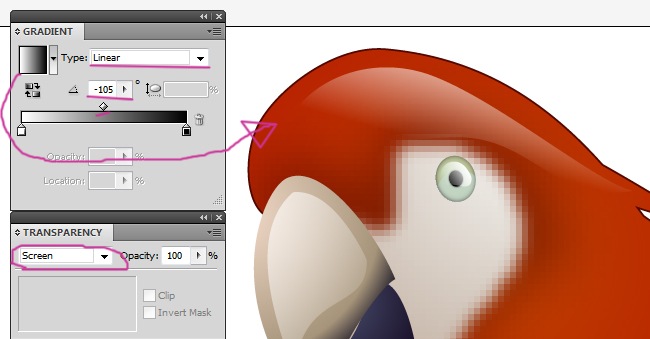
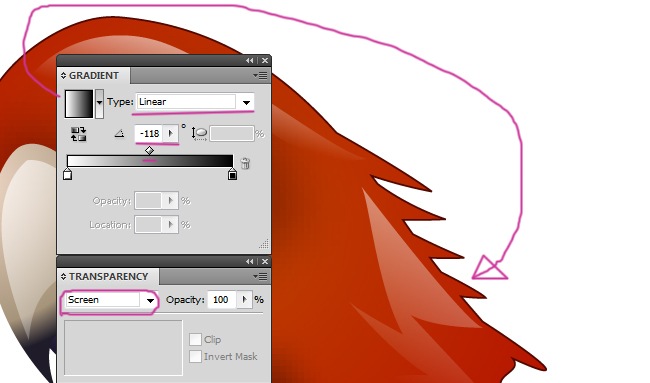
Just two more things and we are done, grab your pen tool and draw a shape on the top of our macaw’s head, it’s going to be a highlight.
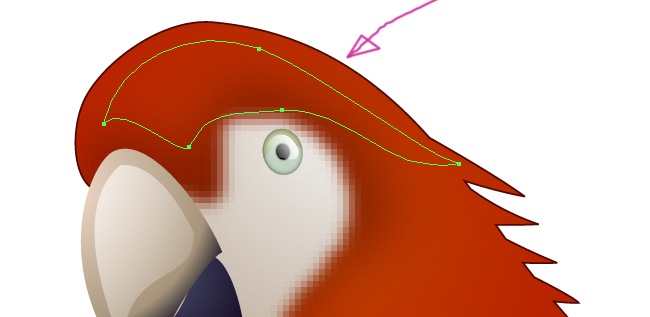
You know what to do next, use a black and white gradient to fill it, linear type, –105 angle and screen blending mode.
And this is it, the final object to complete our macaw, it’s going to be a highlight at the right side of the head.
I know you are probably saying: “ I know, you don’t have to repeat that the highlights are filled with a black and white gradient, linear type and screen blending mode”, but did you know that this time the angle’s value is going to be –118?.
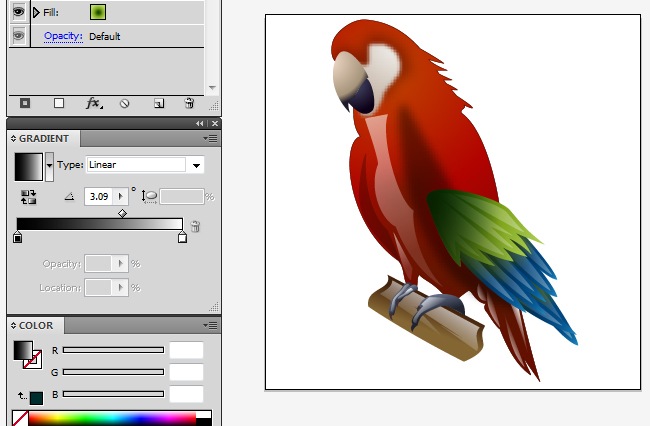
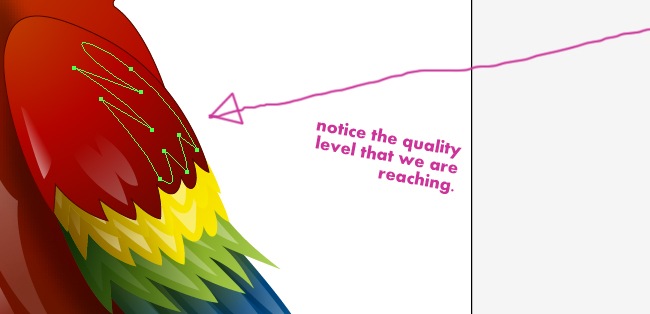
And now we are done, our macaw is ready. We have learned to use graphic styles to generate beautiful elements, gradient fills to emulate volumes and of course, you have become a master with the pen tool, we tried to make this tutorial as complete as possible, if you have any suggestions on how to improve our articles, please let us know, see you soon.