Beside tons of available features, Photoshop is the simplest and best image editing software due to the unique editing options that it offers such as: non-destructive adjustments, non-destructive filters and nondestructive traditional techniques like dodging and burning. In this tutorial I will guide you through the non-destructive edition process and give you some tips how to use all Photoshop power.
Non-destructive Adjustment Layers
Let’s start with non-destructive adjustments which are available in Photoshop CS4/5 through ADJUSTMENTS palette on the right side of screen.For the current and previous versions same adjustments are also available from Layer > New Adjustment Layer > choose from sub-menu or from the bottom of LAYERS palette: click on Create new fill or adjustment layer icon to expand list then choose adjustment.

Advantage of working with adjustment layers is because original image data is protected and what you see on screen is calculation how image will look like if adjustment is applied. You can always change, modify or even delete adjustment layer without affecting original image.
By default Photoshop adds new layer on top of active or selected layer in LAYERS palette so first select any layer (usually layer with image) then go to Layer > New Adjustment Layer > Black and White for example and confirm on OK button in New Layer dialog. New B/W adjustment layer will be created and ADJUSTMENTS palette expanded where you can modify default settings for this adjustment. If you want to modify adjustment later just double click its thumbnail on LAYERS palette, to delete adjustment layer first select it then hit Backspace on your keyboard or go to Layer > Delete > Layer and confirm on YES button in new dialog which will appear.

You can have as many adjustment layers as you want but be aware of order in layers stack because it is desired to work in order in which are adjustments listed: first try with Brightness/Contrast, if this adjustment does not work for you then try with Levels, Curves. It is also logical and desired to work first with tonal and color adjustments (Levels, Curves) then to fine tune color appearance with Vibrance, Hue/Saturation.
Non-destructive Filters and the Benefits of Smart Objects
Photoshop offers tons of filters which are by its nature destructive or in other words you must apply filter directly to pixels on image. When you change pixels there is no way to go back and change filter effect unless layer is converted to Smart Object. Let’s start with definition what are Smart Objects this unique feature in image editing software’s. Many people think and represent Smart Objects as Vector layers but they are actually not vectors. So what are Smart Objects? Smart Objects are layers which preserves image data in computer memory, in other words Photoshop keeps original image in computer memory and we are working in Photoshop with its copy. Every time you change or modify Smart Object Photoshop will pick original image data and redraw Smart Object according to changes you made on it.
Now let’s hear some of the benefits from working with smart objects…..
Transformations without penalty
You can transform Smart Objects as many times as you want without any penalty. Note: scale pixel based Smart Objects only up to 100% of original image, do not upsample pixels above original dimensions.
In particular you can scale original image to 10% of original size, then up to 60%, again down to 25% and so on without any penalty. If you do exact same transformation on regular layer then pixels will look awful and blurry. One more important detail: you can not crop pixels in Smart Object, actually you can use Crop or Marquee tools to crop pixels but also and to go back to original state from Image > Reveal All.
You can edit source data
When you import Camera raw images or Illustrator artwork in Photoshop as Smart Object you can always access original files. In particular you can reopen raw file in Camera raw for further enhancements or reopen Illustrator artwork and change it in any way you want, plus you can upsample Illustrator artwork without any penalty because Photoshop will read PDF data in source file. PDF data means artwork is described as vector using mathematical definition and values (and shape) can be changed without any penalty, artwork edges will remain crisp and smooth. Note: to ensure no penalty transformation like upsampling of Illustrator artwork you must enable both PDFand AICB (No Transparency Support) in the File Handling & Clipboard section of the Preferences dialog box in Adobe Illustrator.
To open image as Smart Object from Camera raw press Shift key on your keyboard and Open Image button will turn into Open Object. To open Illustrator file (.ai) as Smart Object use Open As Smart Object and Place command from File menu or copy and paste artwork in Photoshop. When pasting choose Smart Object in Paste dialog.

To reopen Camera raw or Illustrator file in its native environment just double click Smart Object.

You can create a true clone
In Photoshop you can create true clone of any Smart Object using Duplicate Layer (on right click on Smart Object or from Layer menu) and changing or modifying any of cloned Smart Objects you will get instantly updated all instances or Smart Objects.
There are many ways to convert layer in Photoshop to Smart Object: to open an image as Smart Object you can from File > Open As Smart Object. To convert any layer with pixels including Background layer first select it then go to Filter > Convert for Smart Filters or Layer > Smart Objects > Convert to Smart Object. When layer is converted for Smart Filters you can use non-destructively any available filter and reorder it in filters stack, change it, hide it or even to delete it. Not only single layer but any number of layers can be converted to Smart Object: select all layers you want to convert on LAYERS palette then go to Filter > Convert for Smart Filters.
Every converted layer is represented in LAYERS palette with Smart Object icon which is located at bottom right side of layers thumbnail in LAYERS palette.

To edit content of Smart Object just double click its thumbnail then confirm on OK button in new dialog which will appear. New window or tab will open where you can change and modify Smart. Object content. Do not forget to save changes after editing: easiest way is to click Close (X) and to confirm changes on YES button in dialog which will appear.

To apply any filter non-destructively select layer wit Smart Object and choose any filter from Filter menu. Applied filter will appear below Smart object in layers stack. To temporary hide filter effect click on eye icon on the left side of filters name. To change filter double click its name to open filter dialog. To change blending option and opacity of filter double click two triangles on the right side of filters name. To delete filter click its name and holding down left mouse button drag it to trash icon.

Non-destructive cropping
Photoshop Crop tool offers non-destructive cropping where you can hide unwanted portion instead of cropping it with ability to go back or to change later what is visible at any time even after saving and reopening image. To use this feature you must work on normal layer so first convert if necessary Background layer to normal from Layer > New > Layer From Background. Select Crop tool from toolbox click and drag marquee. In options bar check option Hide and confirm cropping with Enter or Return.

Select Move tool and layer with image previously cropped, click on image and drag to change
Non-destructive dodging and burning
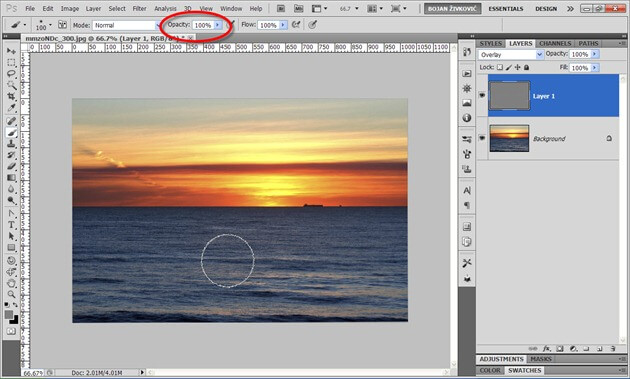
Beside Dodge and Burn tools you can use technique with layer filled with 50% gray to darken or lighten certain portions of your image. First create new empty layer then go to Edit > Fill. In Fill dialog choose 50% Gray from Use: drop down list. Ensure that layer filled with 50% Gray is selected on LAYERS palette then change its blend Mode to Overlay or Soft Light. Select Brush tool and change foreground color if needed to black or white (black to darken, white to lighten). Choose brush with soft edges and lower Opacity (usually to 10-20%) for the brush at options bar which is just below menus, click and paint.

When you want to clear or to remove dodging or burning you have painted hold down Alt key, click on eyeball on the left side of layer filled with 50% Gray and only that layer will stay visible on your screen while other layers will be temporary hidden. Click the Foreground color (upper color selection box in the toolbox) on the left side of screen to open Color Picker (Foreground Color) dialog and sample neutral gray color from image area where you have layer with 50% Gray displayed, be careful to not sample painted area.

Hold down again Alt key and click again eyeball on left side of layer with 50% Gray to go to normal view with all layers visible, change brush Opacity in options bar to 100% and paint over areas where you want to remove adjustment.

Use Shapes Whenever you Can
Shapes in Photoshop are vector objects and can be changed at any time without losing quality in their appearance on screen or when printed. Use shapes whenever you can in your creations. If you need line 3 pixel wide instead of drawing it with Pencil tool which is strictly pixel based tool and can draw only pixels substitute it with Line tool and draw vector line which you can change and modify if needed without losing any quality. Beside default shapes which comes with Photoshop installation you can download Custom Shapes from internet created and shared from other Photoshop users and professionals.
That’s my recommendations on how to use Photoshop power through my experience with this software. Did I miss something? I am using non-destructive image editing all the time, it is my habit and important part of my workflow. What about you’re editing, do you use those options? How much is important non-destructive editing to you?
") Bojan Živkovic
Bojan Živkovic
Bojan Živković from Serbia, is a blogger, writer, Adobe Community, Photoshop Exchange, Wikipedia, Answers.com and so on contributor. His blogs are: http://bzivkovicsavke.blogspot.com/, http://adobephotoshopsecrets.blogspot.com/, http://msofficetipovi.blogspot.com/


")